Kivyのイベントは標準でPropagation(伝播)の仕組みを持っています。この記事では伝播のBubblingとcapturingの仕組みについて説明します。
KivyイベントのPropagation
はじめに、伝播なのか伝搬なのか…どっちが正しいのか教えて?(;´・ω・)
「伝搬」は英語の「to carry」に近い意味を持ち、「伝播」は「to propagate」に近い意味を持ちます。(Google検索のAIより引用)
なるほど?・・・(伝搬って書いてた!)
Kivyのイベントはウィジェットツリー内で伝播する仕組みがあります。伝播はウィジェットが持つイベントが順にトリガーされて各ウィジェットでイベントが実行されます。例えばon_touch_down()イベントを持っている複数のLabelがある場合、それをクリックすると他のLabelも順番にイベントが実行されます。
on_touch_down()とon_press()しか試していませんが、おそらくWidgetクラスやWindowクラスなど基底クラスに属するイベントは伝播の仕組みを持っています。ボタンイベントのon_press()やon_release()などウィジェット固有のイベントは伝播の仕組みを持っていないので手動で構築する必要があります。
Kivy公式ドキュメントでは伝播について詳しく仕様が載っていないので、Webなどの一般的な伝播の仕組みとKivyの現状で説明します。そのため、この記事は間違えている箇所があるかもしれません。
Propagationの方式
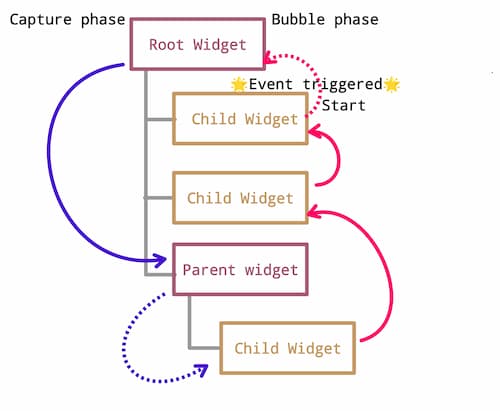
伝播する順番には決まりがあって、最初にトリガーしたウィジェットからルートウィジェットに向かって上に伝播が進むのがBubble upフェーズ、ルートウィジェットから最初にトリガーしたウィジェットに向かって下に伝播が進むのをCaptureフェーズと言います。

Bubble up phase
Bubble upやBubbleフェーズ、bubblingなどと呼ばれています。Bubble upのサンプルを紹介します。
kivy_events_propagation1.py
from kivy.app import App
from kivy.uix.label import Label
from kivy.uix.boxlayout import BoxLayout

class ParentWidget1(BoxLayout):
    def on_touch_down(self, touch):
        print(f'Touch received - Parent 1')
        if self.collide_point(*touch.pos):
            print("Touched Parent 1")
        return super().on_touch_down(touch)

class ChildLabel(Label):
    def on_touch_down(self, touch):
        print(f'Touch received - {self.text}')
        if self.collide_point(*touch.pos):
            print(f'Touched Child: {self.text}')
            return True
        return super().on_touch_down(touch)

class KivyEventsPropagation1(App):
    def build(self):
        return ParentWidget1()

if __name__ == '__main__':
    KivyEventsPropagation1().run()
kivyeventspropagation1.kv
<ParentWidget1>:
    orientation: 'vertical'
    Label:
        text: "Bubble-up phase of propagation"
        font_size: 30
        color: 151/255, 96/255, 124/255, 1
    ChildLabel:
        text: "Child 1 Label"
        font_size: 30
    ChildLabel:
        text: "Child 2 Label"
        font_size: 30
    ChildLabel:
        text: "Child 3 Label"
        font_size: 30
Bubble upの解説
このサンプルは下記のツリー構成になっています。
<ParentWidget1>
+--- BoxLayout # Parent1
+---+--- Label
+---+--- ChildLabel # Child1
+---+--- ChildLabel # Child2
+---+--- ChildLabel # Child3
Bubble upフェーズでは、最初にイベントをトリガーしたウィジェットから上の階層のウィジェットに向かってイベントが伝播します。
Child1をクリックすると下記のように4つのon_touch_down()が伝播し順番にイベントが実行されます。BoxLayoutのすぐ下にあるLabelはイベントを持っていませんがParent1で実行されます。
- Parent1のon_touch_down()が実行されます。
- Child3のon_touch_down()が実行されます。
- Child2のon_touch_down()が実行されます。
- 最後にイベント発生源のChild1のon_touch_down()が実行されます。
コンソールには下記のように表示されます。
Touch received - Parent 1     RootWidget
Touched Parent 1
Touch received - Child 3 Label  ↑
Touch received - Child 2 Label  ↑
Touch received - Child 1 Label   ↑
Touched Child: Child 1 Label   ↑  最初にトリガーしたイベント
Childウィジェットの’Touched’はクリックしたウィジェットで最初にトリガーしたイベントになります。’received’は伝播によって実行されたイベントです。
Capture phase
Kivy公式ドキュメントでは明確な説明がないので仕様がどうなっているかはわかりませんが、現状では基本的にUIウィジェットはbubble upフェーズでレイアウトはCaptureフェーズになっています。これらのフェーズの選択ができると良いのですが、現時点ではそのような説明は見当たりませんでした。
これが正しいかはわかりませんが、Captureフェーズと思われるサンプルを紹介します。
kivy_events_propagation2.py
from kivy.app import App
from kivy.uix.label import Label
from kivy.uix.boxlayout import BoxLayout

class ParentWidget1(BoxLayout):
    def on_touch_down(self, touch):
        print(f'Touch received - Parent 1')
        if self.collide_point(*touch.pos):
            print("Touched Parent 1")
        return super().on_touch_down(touch)

class ParentWidget2(BoxLayout):
    def on_touch_down(self, touch):
        print(f'Touch received - Parent 2')
        if self.collide_point(*touch.pos):
            print("Touched Parent 2")
            #return True
        return super().on_touch_down(touch)

class ParentWidget3(BoxLayout):
    def on_touch_down(self, touch):
        print(f'Touch received - Parent 3')
        if self.collide_point(*touch.pos):
            print("Touched Parent 3")
            #return True
        return super().on_touch_down(touch)

class ChildLabel(Label):
    def on_touch_down(self, touch):
        print(f'Touch received - {self.text}')
        if self.collide_point(*touch.pos):
            print(f'Touched Child: {self.text}')
            return True
        return super().on_touch_down(touch)

class KivyEventsPropagation2(App):
    def build(self):
        return ParentWidget1()

if __name__ == '__main__':
    KivyEventsPropagation2().run()
kivyeventspropagation2.kv
<ParentWidget1>:
    orientation: 'vertical'
    Label:
        text: "Capture phase of propagation"
        font_size: 30
        color: 151/255, 96/255, 124/255, 1

    ParentWidget2:
        ParentWidget3:
            ChildLabel:
                text: "Child 1 Label"
                font_size: 30
Capture phaseの解説
このサンプルは下記のツリー構成になっています。
<ParentWidget1>
+--- BoxLayout # Parent1
+---+--- BoxLayout # Parent2
+---+---+--- BoxLayout # Parent3
+---+---+---+--- ChildLabel # Child1
Captureフェーズでは、ルートウィジェットから最初にイベントをトリガーしたウィジェットに向かって下に伝播します。
Child1のLabelをクリックすると下記のように4つのon_touch_down()が伝播し順番にイベントが実行されます。
- Parent1のon_touch_down()が実行されます。
- Parent2のon_touch_down()が実行されます。
- Parent3のon_touch_down()が実行されます。
- 最後にイベント発生源のChild1のon_touch_down()が実行されます。
コンソールには下記のように表示されます。
Touch received - Parent 1       ↓  RootWidget
Touched Parent 1
Touch received - Parent 2       ↓
Touched Parent 2
Touch received - Parent 3       ↓
Touched Parent 3
Touch received - Child 1 Label  ↓
Touched Child: Child 1 Label       最初にトリガーしたイベント
Propagationの仕組み
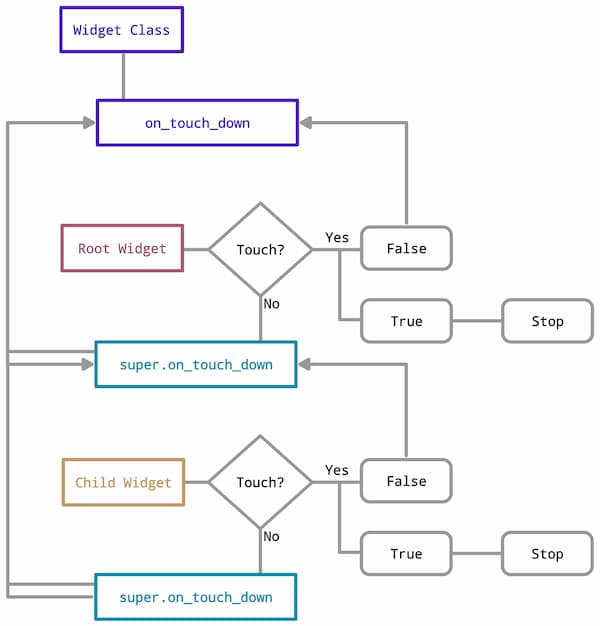
伝播を制御しているのは2つのreturnです。イベントハンドラをオーバーライドした場合、伝播の制御を自分で行う必要があります。
- 親のon_touch_down()を呼び出す
- Trueのフラグを返す
親のon_touch_downを呼び出す
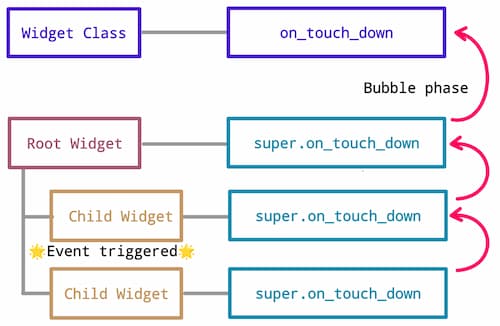
super().on_touch_down(touch)を返すことで伝播を制御することができます。それぞれのサブクラスのon_touch_down()ではsuperを使用して親のon_touch_down()を呼び出すようにします。各ウィジェットのイベントが呼ばれ、最終的に Widgetクラスのon_touch_down()が実行されます。
コードでは下記の部分です。
return super().on_touch_down(touch)例えば下記のツリー構成の場合、それぞれのサブクラスがツリーの親のメソッドを呼び出しています。
<RootWidget>
+--- BoxLayout # Parent1
+---+--- ChildWidget1 # Child1
+---+--- ChildWidget2 # Child2- Child2がタッチイベントを受け取り、自身のon_touch_down()を呼び出します。
- super().on_touch_down()を呼び出すことで、親ウィジェット(この場合RootWidget)の on_touch_down()が呼び出されます。
- Child2が、Child1のon_touch_down()を呼び出します。
- Child1が、RootWidgetのon_touch_down()を呼び出します。
- 最終的にRootWidgetのsuper().on_touch_down()が呼び出され、Widgetクラスのon_touch_down()が実行されます。
このようにon_touch_down()をリレーさせることで伝播が可能になっています。

Trueのフラグを返す
イベントの伝播を止めるにはreturn Trueのフラグを返します。Falseを返すか、この行を書かない場合は伝播は継続されます。デフォルトはFalseです。
「停止する」という言い方は語弊があるかもしれません。使用しないために伝播を「停止」するのではなく、伝播が正しく流れるようにするために「停止」します。
return TrueこのTrueフラグを正しく書かないと上手く伝播されません。
何故伝播の流れを止めるのか
on_touch_down()はウィジェットをタッチして呼ばれる場合と,、前章の伝播の仕組みのために呼ばれる場合の2つのパターンがあります。
class ChildButton(Button):
    def on_touch_down(self, touch):
        # タッチがウィジェットの範囲内にあるか確認
        if self.collide_point(*touch.pos):
            print(f'Touched Child: {self.text}')
            return True  # イベント伝播を止める
        # タッチが範囲外の場合、親クラスのメソッドを呼び出す
return super().on_touch_down(touch)- ウィジェットをタッチしたケース:
collide_point()でウィジェットの範囲内でタッチされたかをチェックし、範囲内であればTrueのフラグを返します。 - 伝播の仕組みの為に呼ばれるケース:
super().on_touch_down()で親のon_touch_down()を呼び出します。
フローにすると下記のようになります。

<RootWidget>
+--- BoxLayout # Parent1
+---+--- ChildWidget1 # Child1  return True
+---+--- ChildWidget2 # Child2 return True- Child1をタッチした時、フラグはTrueになっているので、伝播がここで止まります。
- この時Child2はタッチされていないので親であるParent1のon_touch_down()が呼び出され伝播が進みます。
- Parent1はフラグを書いていないので伝播が進み、親であるWidgetクラスのon_touch_down()が呼び出されます。
Child1とChild2のフラグをFalseにするか、フラグを書かない場合は、どのウィジェットをタッチしても全てのウィジェットのイベントが呼ばれます。このようにしたい場合は別ですが、通常は順番に準じてタッチしたウィジェットより下のウィジェットは呼ばれないようにするのが正しいです。逆に言うとTrueとFalseを使用して特定ののウィジェットのみを伝播されるようにすることでも可能ということです。
Bubble up phaseの場合
Bubble upフェーズの場合はツリーを逆走するので、ウィジェットツリーの上から順に停止することで伝播が正しく流れます。ただし、ルートウィジェットを止めてしまうと伝播されなくなるのでフラグを返さないようにします。
<ParentWidget1>                           上層から停止する。
+--- BoxLayout # Parent1                  Root widgetは停止しない方が良い。
+---+--- Label
+---+--- ChildLabel # Child1              ↓True
+---+--- ChildLabel # Child2              ↓True
+---+--- ChildLabel # Child3              ↓True
下記はBubble upフェーズでの伝播が停止した時に呼ばれるウィジェットを示した表です。基本的に自身のウィジェットとツリーの残りのウィジェットが呼ばれるのが正解です。
| Bubble up phase | Stop propagation | Parent1 | Child1 | Child2 | Child3 |
|---|---|---|---|---|---|
| ↑ | Parent1 | ● | |||
| ↑ | Child1 | ● | ● | ● | ● |
| ↑ | Child2 | ● | ● | ● | |
| ↑ | Child3 | ● | ● |
Capture phaseの場合
Captureフェーズの場合、ウィジェットツリーの下から順に停止することで伝播が正しく流れます。
<ParentWidget1>                            下層から順に停止する。
+--- BoxLayout # Parent1                   ↑True
+---+--- BoxLayout # Parent2               ↑True
+---+---+--- BoxLayout # Parent3           ↑True
+---+---+---+--- ChildLabel # Child1 ↑True下記はCaptureフェーズでの伝播が停止した時に呼ばれるウィジェットを示した表です。基本的に自身のウィジェットとツリーの残りのウィジェットが呼ばれるのが正解です。
| Capture phase | Stop propagation | Parent1 | Parent2 | Parent3 | Child1 |
|---|---|---|---|---|---|
| ↓ | Parent1 | ● | |||
| ↓ | Parent2 | ● | ● | ||
| ↓ | Parent3 | ● | ● | ● | |
| ↓ | Child1 | ● | ● | ● | ● |
Propagationの仕組みを使用しない
伝播はreturn super().on_touch_down(touch)の行を書かない場合は行われません。
return super().on_touch_down(touch)下記のようにフラグをTrueにし、親のon_touch_down()を呼び出さないことで伝播されません。
class ParentWidget1(BoxLayout):
    def on_touch_down(self, touch):
        if self.collide_point(*touch.pos):
            print("Parent 1 Widget touched")
return True余談ですが、kv言語はreturnとsuper()を使うとエラーになるため、伝播の制御をkv言語で書くことはできませんでした。
イベントを呼び出す順番を変更する
公式ドキュメントにindexでイベントの順番を変えることができると書いてありましたが、これはイベントの伝播順番を変えるのではなく、indexでラベルの表示順番を変えるので、結果的にイベントを呼び出す順番が変わるというものでした。(筆者の解釈の違いでした。)これはkv言語で書くことはできませんが、動的にウィジェットの順番を変えたい場合には便利かもしれません。
テキスト「c 」のラベルが最初に、「b 」が2番目に、「a 」が最後にイベントを受け取る。手動でインデックスを指定すれば、この順序を逆にすることができる
class RootWidget(BoxLayout):
    def __init__(self, **kwargs):
        super(RootWidget, self).__init__(**kwargs)
        self.orientation = 'vertical'

        self.label1 = ChildLabel(text='Label1')
        self.label2 = ChildLabel(text='Label2')
        self.label3 = ChildLabel(text='Label3')

        self.add_widget(self.label1,index=2)
        self.add_widget(self.label2,index=0)
self.add_widget(self.label3,index=1)上記の場合、アプリのLabelウィジェットの表示が指定したindexの順番になります。
Label2
Label3
Label1
イベントの伝播順番は下記になります。
Touch in BoxLayout 1
@Touch in BoxLayout 1
Touch label - Label2
Touch label - Label3
Touch label - Label1
Touch label: Label1
on_pressやon_releaseのPropagation
ボタンイベントのon_press()やon_release()は伝播の仕組みを持っていません。on_touch_*で代用するか、カスタムイベントとして定義し、伝播の仕組みを手動で構築する必要があります。on_press()のサンプルコードを下記の記事で紹介しています。
Callback関数のPropagation
on_touch_*のコールバック関数を呼び出すこともできます。ウィジェットツリーをより複雑にした例を紹介します。
kivy_events_propagation3.py
from kivy.app import App
from kivy.uix.label import Label
from kivy.uix.button import Button
from kivy.uix.boxlayout import BoxLayout

class ParentWidget1(BoxLayout):

    def on_touch_down(self, touch):
        print(f'Touch received - Parent 1')
        if self.collide_point(*touch.pos):
            print("Touched Parent 1")
        return super().on_touch_down(touch)

    def on_click(self):
        print("Callback called from Child 4.")

class ParentWidget2(BoxLayout):
    def on_touch_down(self, touch):
        print(f'Touch received - Parent 2')
        if self.collide_point(*touch.pos):
            print("Touched Parent 2")
        return super().on_touch_down(touch)

class ChildLabel(Label):
    def on_touch_down(self, touch):
        print(f'Touch received - {self.text}')
        if self.collide_point(*touch.pos):
            print(f'Touched Child: {self.text}')
            return True
        return super().on_touch_down(touch)

class ChildButton(Button):
    def on_touch_down(self, touch):
        print(f'Touch received - {self.text}')
        if self.collide_point(*touch.pos):
            print(f'Touched Child: {self.text}')
            return True
        return super().on_touch_down(touch)

class KivyEventsPropagation3(App):
    def build(self):
        return ParentWidget1()

    def on_click(self):
        print("Callback called from Child 6.")

if __name__ == '__main__':
    KivyEventsPropagation3().run()
kivyeventspropagation3.kv
<ParentWidget1>:
    orientation: 'vertical'
    ChildLabel:
        text: "Child 1 Label"
    ChildLabel:
        text: "Child 2 Label"
    ChildLabel:
        text: "Child 3 Label"
    ChildButton:
        text: "Child 4 button"
        on_touch_down: root.on_click()

    ParentWidget2:
        ChildLabel:
            text: "Child 5 Label"
        ChildButton:
            text: "Child 6 button"
            on_touch_down: app.on_click()

<ChildLabel,ChildButton>:
    font_size: 30


Comment