Following the previous article on MSL2 and Buildozer installation, this article explains how to create an APK or AAB for an Android app using Buildozer for a Kivy app. iOS app format (IPA) can also be created, but we will exclude it this time.
Files that Can Be Converted With Buildozer
Buildozer can create APK and AAB for Android apps and IPA for iOS apps, and it also seems to be able to create AAR for the Android module library, but it didn’t work. The IPA conversion in Buildozer only works on MacOS. We have not verified IPA, so we do not know if it works or not. (You can probably create one).
How to Create a Mobile app With Buildozer
This article assumes that you have already created a virtual environment and installed Buildozer.
Please see the following article on how to install Buildozer in MSL2.
To convert it to a mobile app, you will need the Android SDK and NDK. However, this is automatically downloaded by Buildozer. You can install it yourself and specify the version in the configuration file, but you will probably get an error if it is not a fixed version.
Preparing the App for Testing
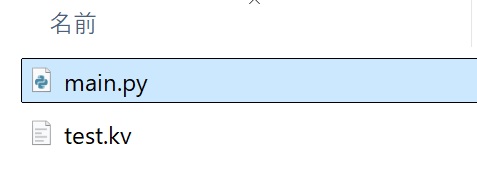
Prepare the application for Test in advance, and make the Python file “main.py”. Note that if the file is not “main.py,” it will stop with an error. Simple apps that do not use resource files such as font files or image files are good for test apps.
Because Buildozer is made using several libraries, dependencies are difficult to handle, and if the environment is not set up properly, an error will occur and you will not be able to create the application. Also, if the configuration file is written incorrectly, an error may occur and you may not be able to create the application. To isolate the problem when an error occurs, first test whether APK and AAB can be created properly.
- Make a simple test application that does not contain resources such as font files or image files.
- Name the Python file “main.py”.
- If there is a kv file, put it in the same hierarchy.
Place the Test App in the Ubuntu Folder
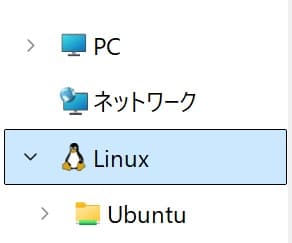
MSL is based on command operation, but you can access the Ubuntu folder from Windows Explorer.
- Step1Access the Ubuntu folder from Explorer
Access the Ubuntu folder from Explorer.

- Step2Create a project folder in any location
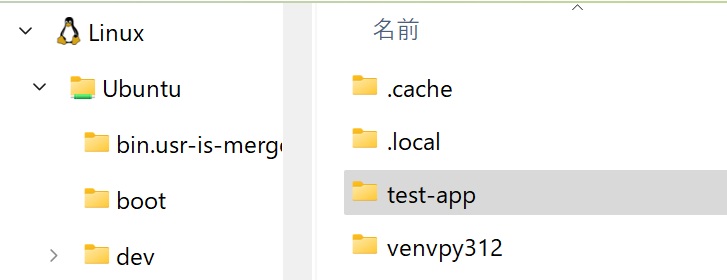
Create a folder for the application. The [/home/] folder is equivalent to the [C:\Users\] folder in Windows. This folder has no permissions, so it is a good idea to make it a permanent folder. In this case, we will create a folder called “test-app” in the [/home/] folder.

- Step3Place the app files
Place all the app files in the project folder.

Creating APK File
The procedure for creating a mobile app, whether APK, AAB or IPA, is a little different in terms of the contents of the configuration file (spec file) and commands, but the basic creation procedure is the same for all of them.
- Create a project folder.
- Generate a “buildozer.spec” file to configure the application.
- Build the app.
- Delete build information. (if necessary)
- Step1Move to the project folder
Please do so in virtual environment mode.
Enter the path of the project folder.
cd /home/user/test-app - Step2Generate Buildozer spec file
Execute the command to generate a spec file to configure the settings for building Buildozer and information about the Android application.
buildozer -v initA “buildozer.spec” file will be generated in the folder where you are (i.e. /home/user/test-app).
- Step3Edit buildozer.spec
For this test, we will not edit the configuration file.
- Step4Generate APK
Build the Android APK. It may take some time to download the necessary libraries the first time. It will stop twice to approve the license at the beginning. To do so, enter “y” and press “Enter”.
buildozer -v android debugIf the following message is displayed, you have succeeded. If it stops at the message in red, an error has occurred.
# Android packaging done!
# APK myapp-0.1-arm64-v8a_armeabi-v7a-debug.apk available in the bin directory
By default, the apk file is created in the bin folder in the project folder.
- Step5Clear build information
If an error occurs, be sure to delete the build information cache. If this remains, there is a possibility that an unnecessary error will occur next time. If you do not do this, the next run will build using the cached information and will be very fast. This is useful when using spec files with the same contents.
buildozer android clean
Creating the AAB File
Next, create AAB file. AAB file is a format for distribution via Google Play, so it cannot be run on real devices or emulators. AAB file must have signature information, but since this is a test, we will not set the signature information this time.
- Step1Move to the project folder
Please do this in virtual environment mode.
Enter the path to the project folder.
cd /home/user/test-app - Step2Edit buildozer.spec
For this test, we will not edit the configuration file.
- Step3Create AAB
When creating an AAB, the release option is used. Since AAB is for release, you need to set the domain in the spec file. If the domain setting in the spec file is left at the default value, the following error will occur.
# ERROR: Trying to release a package that starts with org.test
#
# The package.domain org.test is, as the name intented, a test.
# Once you published an application with org.test,
# you cannot change it, it will be part of the identifier
# for Google Play / App Store / etc.
#
# So change package.domain to anything else.
#
# If you messed up before, set the environment variable to force the build:
# export BUILDOZER_ALLOW_ORG_TEST_DOMAIN=1
This time, since it is a test, temporarily set the environment variable as shown in the message and execute.
export BUILDOZER_ALLOW_ORG_TEST_DOMAIN=1
buildozer -v android release
It will not take as long as the first one. If the following message is displayed, you have succeeded. If the message in red is displayed, an error has occurred.
# Android packaging done!
# APK myapp-0.1-arm64-v8a_armeabi-v7a-debug.apk available in the bin directory
By default, the AAB file is created in the bin folder in the project folder.
- Step4Clear build information
If an error occurs, delete the build information.
buildozer android clean
Confirmation of APK File
Now that the APK file has been created, you can check it on the actual device or an emulator. However, since nothing has been set, the environment can be started with default settings. If your version is higher than the environment below, make sure that the AAB file can be created before recreating it.
We recommend using Android Studio as an emulator. It is very convenient because it can be used as a stand-alone emulator, and the screen size and OS version can be set. Drag and drop the apk onto the emulator to install it.
Spec File Configuration Items
You can use the same spec file for both APK and AAB, but it is recommended to separate the spec file for APK and for AAB.
How to Check the Log
If an error occurs, check the log first.
How to Output Buildozer Logs in a File
Buildozer has a pattern of errors that can occur when the environment is not built properly or during the file conversion process.
It will proceed unless there is a fatal error. Currently, the creation is completed even though the log shows ERROR. Then, if there are too many errors, it seems to stop at that point. If it stops at the red message, an error has occurred, and the area above the red message is the point where it stopped due to an error. So, if you check that area, you will see an ERROR or WARNING message. Sometimes the message is not displayed. If the environment is not being built properly, the error message may not be displayed, or the error message may be misplaced, so it may be difficult to identify the error message. If the environment is being built successfully, the message is rather precise.
If you check the console screen, the log is displayed, but if you want to output it to a file, use the following command. Drag and drop a text file onto the console screen to enter the path to the file.
Any extension can be used for the text file name. In the following cases, logs will be created in the project folder.
buildozer -v android [debug,release] > [text filename] 2>&1Step1. Output both standard log and error log
buildozer -v android debug > buildozer_debug.log 2>&1Step2. Only output the error log
buildozer -v android debug 2> buildozer_error.logIf you output the log, the log will not be displayed on the console screen. When debugging for the first time, it stops twice to check the license. Refresh Explorer with F5 to check the size of the log write, and if the size has not increased, it has stopped, so press y and Enter. If the size of the log is not increasing, it is stopped, so press “y” and “Enter”. If it completes successfully, the total size is about 6 MB.
Check the Android Application Log With the ADB Command
This is how to check the logs when using the Android studio emulator. With the emulator running, you can use the adb command to control the device. The terminal can also be operated while connected to the actual device with a USB cable. (Settings to connect to the actual device are required.)
To execute the adb command, you need to set environment variables. I will skip this explanation. The following is an environment variable setting that allows adb to be used temporarily in the Power shell. The settings will disappear when you close the terminal. The following command is from the Power shell.
$ENV:Path+=";C:\Users\ < username > \AppData\Local\Android\Sdk\platform-tools"Run the app on the emulator and then execute the following to get the logs. You can drag and drop a text file onto the console screen and enter the path to the file.
adb logcat | select-string python > [ Path to Log ]adb logcat | select-string python > "C:\Users\user\Desktop\adb-log.txt"The log is appended, so if you want to clear the log information, do the following
adb logcat -cOnce the log is output, console input is disabled, so to make it ready for input, press Ctrl+c.


Comment