
Kivy offers a variety of UI widgets, but it is possible to create your own customized widgets. This article explains how to create a custom widget and how to access the root widget from a custom widget.
How to Create Custom Widgets
Kivy provides a variety of UI widgets, but it is possible to create your own customized widgets.
To create a custom widget, inherit from the widget. Inherited subclasses are treated as custom widgets.
For example, if you simply want to describe some processing, you can extend the Widget class, which is the base class for UI widgets.
from kivy.uix.widget import Widget

class CustomWidget1(Widget):
    pass
If you want to inherit from a single widget, inherit from that widget.
from kivy.uix.label import Label

class CustomWidget2(Label):
    pass
from kivy.uix.label import Button
class CustomWidget3(Button):
passIf it inherits a layout, it is still a custom widget.
from kivy.uix.boxlayout import BoxLayout
class CustomWidget4(BoxLayout):
passThese custom widgets are defined in kv code with class rules and other rules to define styles and settings. (Of course, they can also be written in Python code.)
# Python file
from kivy.app import App
from kivy.uix.boxlayout import BoxLayout
from kivy.uix.widget import Widget
from kivy.uix.label import Label
from kivy.uix.button import Button
class CustomWidget1(Widget):
pass
class CustomWidget2(Label):
pass
class CustomWidget3(Button):
pass
class CustomWidget4(BoxLayout):
pass
class RootWidget(BoxLayout):
pass
class MyApp(App):
def build(self):
return CustomWidget()
if __name__ == '__main__':
MyApp().run()# kv file
<CustomWidget1>:
<CustomWidget2>:
text: "Label"
<CustomWidget3>:
text: "Button"
<CustomWidget4>:
Label:
Button:
<RootWidget>: # Tree of root widget
CustomWidget1:
CustomWidget2:
CustomWidget3:
CustomWidget4:
Label:
text: "Arrange the widgets in the order in which you want them to appear."
Button:
text: "You can combine regular and custom widgets."
Once you have defined your custom widgets, place them in the root widget tree. The root widget tree makes up the screen. If you do not do this, the custom widget will not be displayed because it is independent.
<RootWidget>:
CustomWidget1:
CustomWidget2:
CustomWidget3:
CustomWidget4:Here, the custom widgets are arranged in the order in which you want them to appear in the ” RootWidget ” of the root widget.
Creating Custom Widgets Using Only KV Code
For simple processes, you can also define a custom widget using only kv code by using the Dynamic Class rules. Dynamic Classes defines class inheritance in kv code, so it has the same meaning as the following description in Python code.
from kivy.uix.label import Button

class CustomWidget3(Button):
pass<CustomWidget3@Button>:
text: "button"
<RootWidget>:
CustomWidget3:Place it in the RootWidget tree in the same way as the class rules. Details of dynamic classes are explained in the following pages.

When Using an id in a Custom widget
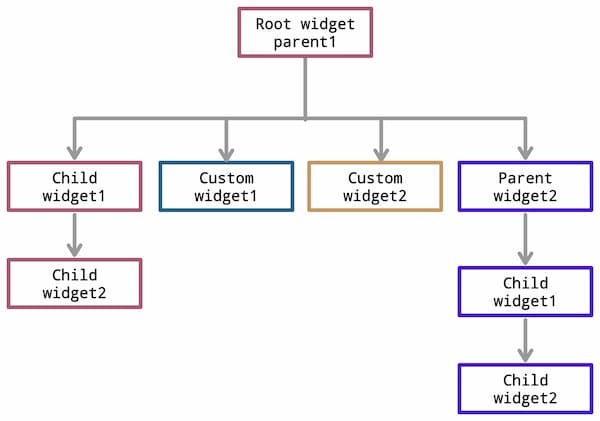
When defining an id in a custom widget, it is usually defined in the root widget’s tree. id has a scope and can be referenced from the root widget by defining it in the root widget’s tree. Custom widgets are in the root widget’s tree, but they are separate trees that branch off from the root widget. Therefore, those trees are out of scope and cannot access each other.
RootWidget             # Root widget
---+ CustomWidget1     # Other children in custody
---+ CustomWidget2     # Other children in custody
---+ CustomWidget3     # Other children in custody
---+-CustomWidget4   # Another tree further branched from root
---+ Label             # Child of root widget
---+ Button            # Child of root widget
It may be easier to understand if the trees are arranged horizontally. In the configuration shown below, the widgets in the vertical line are accessible to each other, but not to the widgets in the horizontal line. The root widget and App can access any widget. (However, the keywords to access them are different.)
For more information on id, please see the following article.
For more information about keywords to access, please see the following article.
Define the id in the root widget tree as follows.
<RootWidget>:
    CustomWidget1:
    CustomWidget2:
        id: custom2
    CustomWidget3:
        id: custom3
    CustomWidget4:
        id: custom4
    Label:
        id: root_label
    Button:
        id: root_button
Accessing Root from Custom Widgets With KV Code
In the case of kv code, when accessing methods and variables of other classes from a custom widget, the same as for id, the class of the widget in the other tree cannot be accessed. (You can access them from Python code.) You can access methods and variables of your own class and the class of the root widget.
For complex configurations, it is preferable to manage processing in the root widget, rather than implementing it in each class, unless it can only be handled by that widget. It may also be a good idea to manage processing for the entire application in the App subclass.
The following is a example of accessing the root from a custom widget.
custom_widget.py
from kivy.app import App
from kivy.uix.boxlayout import BoxLayout
from kivy.uix.widget import Widget
from kivy.uix.label import Label
from kivy.uix.button import Button

class CustomWidget1(Widget):
    def custom1(self):
        print("custom1")

class CustomWidget2(Label):
    def custom2(self):
        print("custom2")

class CustomWidget3(Button):
    def custom3(self):
        print("custom3")

class CustomWidget4(BoxLayout):
    def custom4(self):
        print("custom4")

    obj = CustomWidget3()
    obj.custom3()

class RootWidget(BoxLayout):
    def root1(self):
        print("Root")

class CustomWidget(App):
    def build(self):
        return RootWidget()

if __name__ == '__main__':
    CustomWidget().run()
customwidget.kv
<CustomWidget1>:
    canvas.before:
        Color:
            rgba: 42/255, 100/255, 89/255, 1
        Rectangle:
            size: self.size
            pos: self.pos

<CustomWidget2>:
    id: custom2
    text: "custom_widget2"
    on_touch_down:
        if self.collide_point(*args[1].pos):self.custom2(); self.parent.root1(); app.root.root1()

<CustomWidget3>:
    id: custom3
    text: "custom_widget3"
    on_press:
        self.custom3()
        self.parent.root1() # Same as below line
        app.root.root1() # Same as above line

<CustomWidget4>:
    Label:
        id: custom4_label
        text: f"custom_widget4"
    Button:
        id: custom4_button
        text: f"custom_widget4 Button"
        on_press:
            app.root.root1()
            root.custom4()  # Same as below line
            self.parent.custom4() # Same as above line

<RootWidget>: # Tree of root widgets
    orientation: 'vertical'
    CustomWidget1:
    CustomWidget2:
        id: custom2
    CustomWidget3:
        id: custom3
    CustomWidget4:
        id: custom4
    Label:
        id: root_label
        text: "Arrange the widgets in the order in which you want them to appear."
    Button:
        id: root_button
        text: "You can combine regular and custom widgets."
Comment