
This section explains how to display images in the Kivy application and how to change the image size, animated images, cache, and other settings. It also explains how to use images as buttons and how to overlay text and images on images.
Displaying Images in Kivy
To display images in Kivy, use the Image class.
kivy.uix.image
Types of Images Kivy Can Handle
Kivy supports the following image formats (extensions) by default.
- PNG (.png): Transparent pngs are also supported.
- JPEG (.jpg, .jpeg)
- GIF (.gif): Animated gifs and transparent gifs are also supported.
- BMP (.bmp)
- ICO (.ico)
- SVG (.svg)
Atlas can be handled using the Pillow library.
How to Display Images
To display an image, specify the path to the image in the source property.
The image will be placed in a widget box and will be sized to fit the widget box by default. If the image is smaller than the widget box, the original image size is retained. In this case, the non-image portion of the widget box will be left blank and the background color will be displayed.
<RootWidget>:
    Image:
        source: 'images/icon-001.png'
The above code places the images folder in the same location as the source code. For mobile apps, it is recommended to use a method to obtain absolute paths rather than relative paths.
Project folder
+--- Images folder
+---+--- image.png
+--- py file
+--- kv file
Working With Images
The Image class provides several methods and properties for working with images. The following are some of the most commonly used of these.
- fit_mode: Change the image size.
- color: Applies color to the image.
- anim_delay:Sets the animation playback speed.
- anim_loop: Sets the number of times the animation loops.
- nocache: Set internal cache settings.
- remove_from_cache(): removes the cache.
- reload(): Reloads an image from disk.
Changing the Image Size
The fit_mode property has four modes for changing the image size
- scale-down: the image is scaled down to fit the widget box.
- fill: the image will be enlarged to fit the widget box.
- contain: the image will be resized to fit the widget box.
- cover: The image will be stretched horizontally or vertically to fit the widget box.
Similarly, the allow_stretch and keep_ratio properties for resizing images have been deprecated since Kivy 2.2.0; they are available in Kivy 2.3.1, but a warning is displayed. It may be removed in the future.
scale-down
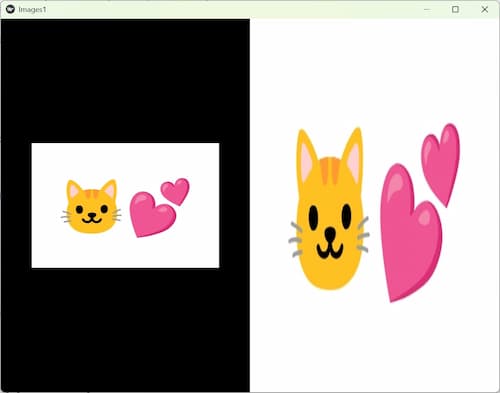
scale-down will scale the image down to fit in the widget box. If the image size is smaller than the widget, it will be displayed in its original size. If the aspect ratio of the image is different from that of the widget, the widget box will be blank and the background color will be displayed. This scale-down is the default.

fill
fill expands the image to the size of the widget box. The aspect ratio is ignored, so the image display may be corrupted.
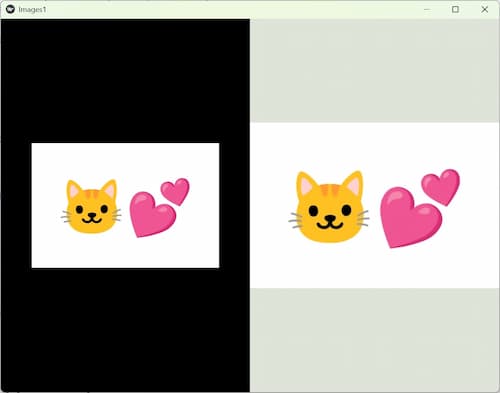
contain
With contain, the image is resized to fit the widget box, but the aspect ratio is preserved. If the image size is larger than the widget box, it is scaled down. If the image size is smaller than the widget box, the image is resized to fit within the widget. If the image aspect ratio is different from the widget, the widget box will be blank and the background color will be displayed.
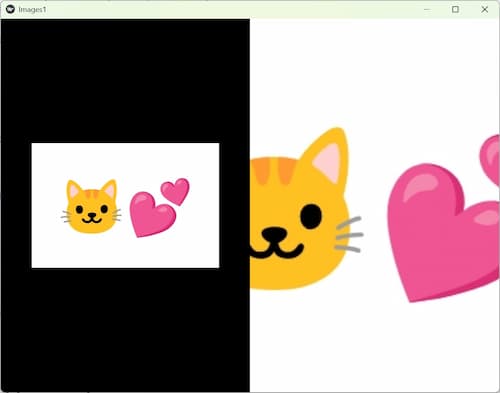
cover
For cover, the image is stretched horizontally or vertically to fit within the widget box. This maintains the aspect ratio and fills the widget box based on either horizontal or vertical size. If the aspect ratio of the image is different from the widget, the image will be cropped.
Adding Color to an Image
To add color to an image, specify an RGBA value with the color property. This is not to change the color of the image, but to add color on top of the original image. However, if the image is not gray or white, the color will not work as expected.
color: 1, 0, 1, 1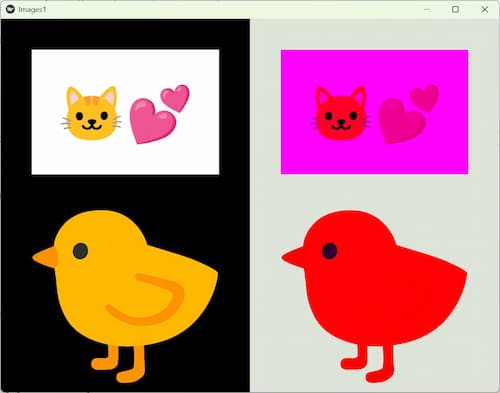
Manipulating Animated Images
You can set the animation speed and number of playback for animated GIFs and other animations.
Setting the Animation Playback Speed
To set the animation playback speed, define anim_delay. The default is 0.25 (4 FPS). If “-1” is specified, the animation will stop and the image will be static.
anim_delay: 1.0To Set the Number of Times the Animation Loops
To set the number of times the animation loops, define the anim_loop property. The default is 0, which means the animation will be persistent.
anim_loop: 5Configure Cache Settings
Kivy uses an internal cache by default, but this can be disabled. You can also remove the cache with remove_from_cache().
Disabling the Internal Cache
Specify whether to use the internal cache with nocache True or False; True disables the internal cache, and the default is False, which enables the internal cache.
nocache: TrueDeleting the Cache
To remove the cache, use remove_from_cache(). Below is an example of removing the image cache
from kivy.uix.image import Image

class RootWidget(BoxLayout):
    def on_stop(self):
        # Clear the image cache.
        for image in Image._image_cache:
            Image._image_cache[image].remove_from_cache()
        Image._image_cache.clear()
This code removes the image cache when the application exits. on_stop() is Kivy’s event callback called when the application exits. the for statement does the following
- Checking the image cache.
- Deleting the image cache.
- Delete dictionaries in the image cache.
Checking the Image Cache
Image._image_cache is a dictionary that holds the image cache used internally by Kivy. All images used by the application are cached here.
for image in Image._image_cache:Removing the Image cache
For each image, remove_from_cache() is called to remove the image from the cache.
Image._image_cache[image].remove_from_cache()Removing a Dictionary from the Image Cache
The cache dictionary itself is cleared by calling clear(). This removes all image caches in the cache.
Image._image_cache.clear()Code Example to Display Images
Let’s check what we have described so far with a example of code. Try it with different settings.
images1.py
from kivy.app import App
from kivy.uix.gridlayout import GridLayout
from kivy.uix.image import Image

class RootWidget(GridLayout):
    def on_stop(self):
        # Clear the image cache.
        for image in Image._image_cache:
            Image._image_cache[image].remove_from_cache()
        Image._image_cache.clear()

class Images1(App):
    def build(self):
        return RootWidget()

if __name__ == '__main__':
    Images1().run()
images1.kv
<RootWidget>:
    cols: 2
    Image:
        source: 'images/image-007.jpg'
        nocache: True
    Image:
        canvas.before:
            Color:
                rgba: 222/255, 228/255, 215/255, 1
            Rectangle:
                size: self.size
                pos: self.pos

        source: 'images/image-007.jpg'

        fit_mode: 'scale-down' # default
        #fit_mode: 'fill'
        #fit_mode: 'contain'
        #fit_mode: 'cover'

        #color: 1, 0, 1, 1

        #anim_delay: 0.1
        #anim_loop: 5
Using Images as Buttons
To enable images to be used as buttons, use the ButtonBehavior class in Kivy’s Behavior module.
Kivy’s Behavior module provides several mixin classes that combine some behavior with basic widgets such as buttons and labels. Among them, the ButtonBehavior class provides the ability to treat widgets as if they were buttons.
images2.py
from kivy.app import App
from kivy.uix.boxlayout import BoxLayout

class RootWidget(BoxLayout):
    pass

class Images2(App):
    def build(self):
        return RootWidget()

if __name__ == '__main__':
    Images2().run()
images2.kv
<ImageButton@ButtonBehavior+Image>
    source: 'images/image-ts-005.png'

<RootWidget>:
    Label:
        id: label
        text: 'You can click on the image'

    ImageButton:
        on_press: label.text = 'ImageButton Pressed'
        on_release: self.source = 'images/image-ts-006.png'
        #on_touch_down: label.text = 'ImageButton touched'
In this example, a message is displayed when on_press() is called, and another image is displayed when on_release() is called.
The first line of kv code uses dynamic class rules to create a custom widget by multiple inheritance of the ButtonBehavior and Image classes. See the following article for more information on dynamic class rules.
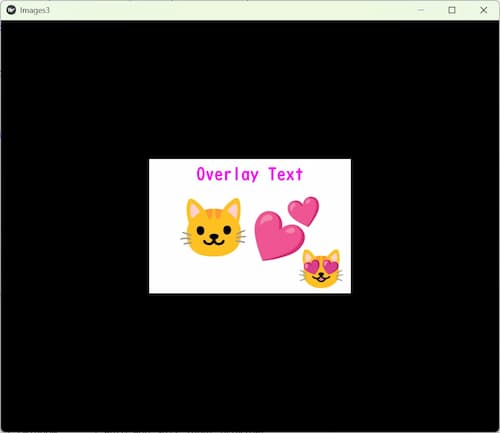
Overlay Text on an Image
You can overlay text on top of an image. Images can be overlaid in addition to text. This is possible with layouts that allow widgets to be placed in any position. The following shows if this is possible using a stand-alone layout.
When this code is executed, the image is displayed as shown below.
images3.py
from kivy.app import App
from kivy.uix.floatlayout import FloatLayout

class RootWidget(FloatLayout):
    pass

class Images3(App):
    def build(self):
        return RootWidget()

if __name__ == '__main__':
    Images3().run()
images3.kv
<RootWidget>:
    Image:
        source: 'images/image-007.jpg'
    Image:
        source: 'images/icon-001.png'
        #pos_hint: {"center_x": 0.6, "center_y": 0.4}
        x: int(self.x / 2 + 80)
        y: int(self.y / 2 - 50)
    Label:
        text: 'Overlay Text'
        color: 1, 0, 1, 1
        font_size: 40
        size_hint: None, None
        size: 300, 50
        pos_hint: {"center_x": 0.5}
        y: int(self.parent.height / 2 + 90)
Simply adjusting the position with pos_hint. Perhaps using a canvas would allow for more complexity.
See the following article for more information on setting widget size and position.
The image and label text will move when the screen size changes, so the position is calculated based on its own position and the size of the parent.
x: int(self.x / 2 + 80)
y: int(self.y / 2 - 50)
y: int(self.parent.height / 2 + 90)
Comment