
This section explains how to use BoxLayout, Kivy’s basic layout.
What Is BoxLayout?
A layout is like a container, and a BoxLayout arranges UI widgets vertically (portrait) or horizontally (landscape). If the orientation property is not specified, it is horizontal.
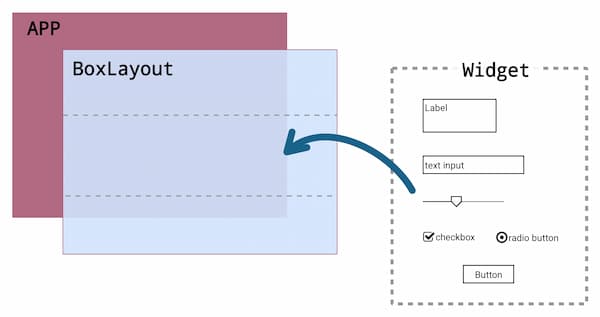
Since BoxLayout is a layout for aligning widgets, it is not possible to set widgets in any position. Therefore, the pos and pos_hint properties, which set the widget position, and size_hint, which sets the widget size, may not work correctly.
If you want to set widgets at arbitrary positions, other layout methods such as FloatLayout or RelativeLayout may be more suitable.
Setting the Direction of Widget Placement
To set the direction in which widgets are placed, specify either vertical or horizontal for the orientation property. If you want the widget to be positioned horizontally, you do not have to define it since it is the default value.
BoxLayout:
    orientation: 'horizontal'
BoxLayout:
orientation: 'vertical'Setting the Inner Margin (padding)
To set the margins between the widget and the inside of the layout, define the padding property.
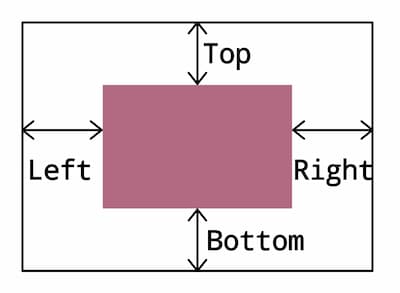
- padding_left: left margin
- padding_top: top margin
- padding_right: right margin
- padding_bottom: Bottom margin
The default is 0 in all directions. This means that the screen area will be filled with widgets without margins.
Note that setting a value that exceeds the size of the screen area will not result in an error, as the widget will simply disappear from the screen. For example, if the screen size is 500×500, setting padding to 1000 will not cause an error.
There are three ways to write the padding property. The numerical values are in pixels.
The padding Writing Method (1)
Specify with [0,0,0,0,0]. (left, top, right, bottom).
padding: 50, 100, 50, 100The padding Writing Method (2)
Specify the horizontal and vertical margins.
padding: 50, 100The padding Writing Method (3)
Specify all directions together. This is recommended if you want to set the same margins for all.
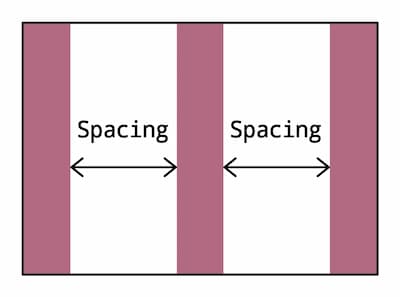
padding: 100Setting the Margins Between Widgets
To set the margins between widgets, define the spacing property. The unit is pixels.
spacing: 20Code Example
Try changing the values of the padding and spacing properties. Make sure that the widget is automatically adjusted to fit the margins and is responsive.
boxlayout1.py
from kivy.app import App
from kivy.uix.boxlayout import BoxLayout

class RootWidget(BoxLayout):
    pass

class BoxLayout1(App):
    def build(self):
        return RootWidget()

if __name__ == "__main__":
    BoxLayout1().run()
boxlayout1.kv
<RootWidget>:
    orientation: 'vertical'
    #padding: 20000, 10, 10, 10 # Example of widget disappearing from screen.
    #padding: 300, 300
    padding: 100
    spacing: 100

    Button:
        text: 'Button'

    Button:
        text: 'Button'
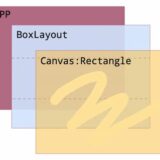
Nesting a BoxLayout
Layouts can also be nested. However, multiple nested layouts can be heavy, and may result in unintended behavior due to the scope of the id. Also, due to the scope of the id and other factors, it may result in unintended behavior.
Sample Code
The tree structure is as follows. There are three vertically aligned cells, and the middle cell is nested in a BoxLayout and aligned horizontally.
<RootWidget>
+--- BoxLayout
+---+--- Button
+---+--- BoxLayout
+---+---+--- Button
+---+---+--- Button
+---+--- Button
boxlayout2.py
from kivy.app import App
from kivy.uix.boxlayout import BoxLayout

class RootWidget(BoxLayout):
    pass

class BoxLayout2(App):
    def build(self):
        return RootWidget()

if __name__ == "__main__":
    BoxLayout2().run()
boxlayout2.kv
<RootWidget>:
    orientation: 'vertical'
    padding: 100
    spacing: 100

    Button:
        text: 'Button'

    BoxLayout:
        orientation: 'horizontal'
        #padding: 100
        #spacing: 50

        Button:
            text: 'Button'

        Button:
            text: 'Button'

    Button:
        text: 'Button'
Examples of Settings That Can Cause Widgets to Stop Working
Depending on the padding and spacing settings, the widget may not function. Try uncommenting the above sample code.
#padding: 100
#spacing: 50
As shown in the red circle in the figure below, “ー” is displayed and the widget does not function as a button. This can be fixed by maximizing the screen size, but the default screen size indicates that the margin width is too large as a result of automatic adjustment by Kivy.

To Set the Background Color of a Layout
Changing the background color of a layout is a bit tricky because there is no property like BACKGROUND. For details, please see below for a separate article.
To Change the size of Widgets
Use size_hint to resize widgets. For details, please see below for a separate article.

Examples of pos_hint and size_hint
The pos and pos_hint properties, which set the widget position, may not function correctly. Similarly, size_hint, which sets the widget size, may not function correctly. These properties may be used, but may only work for either the x-axis or y-axis.
For example, in the following case, the button is set to appear in the center of the screen’s height and width, but the y (vertical size) of the size_hint is not working and the size is 100%.
<RootWidget>:
    orientation: 'vertical'

    Button:
        text: 'Button'
        pos_hint: {'center_x': 0.5, 'center_y': 0.5}
        size_hint: 0.3, 0.2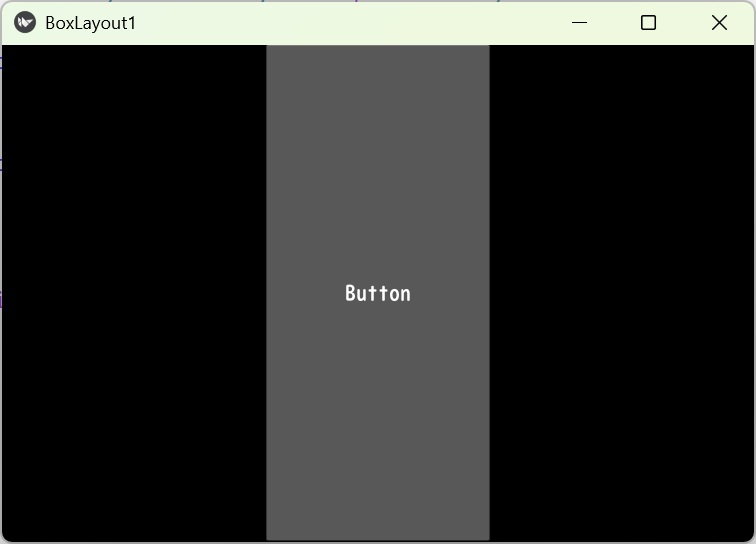
Comment