
This article explains how events work in Kivy and how to use the event handlers provided by Kivy. This article explains how to write on_touch_down() as an example.Kivy provides several event functions by default, but you can also create your own custom events.
Types of Kivy Events
Kivy events can be broadly categorized into three types. This article describes how to use the built-in events handlers provided by Kivy.
- Kivy Built-in Events
- Custom Events
- Clock(), Property(), and other events
Kivy Built-in Events
Most of Kivy’s standard event handlers are functions prefixed with “on_”. These event handlers are built into widgets by default, and some are common to several widgets , such as on_touch_down(), while others are specific to a particular widget. In addition to the event handlers associated with widgets, there are also a number of event handlers for the Window class. In most cases, event handling can be achieved by combining these standard Kivy events with callback functions that you create yourself. Some of the event handlers are listed below.
- on_press() : This event is called when a mouse click is pressed.
- on_release() : This event is called when a mouse click is released.
- on_touch_down() : event called when a mouse click or touch input touches the screen.
- on_touch_move() : event called when a touch or drag operation moves.
- on_touch_up() : event called when a touch operation leaves the screen.
- on_size() : Event called when a widget size is changed.
- on_kv_post() : Event called after kv language is loaded.
Custom Events
Custom events allow you to create and register your own event functions and dispatch(manage the generation of events) events. It is also possible to link callback functions using bind() and fbind().
Events such as Clock and Property
Clock Events
Kivy’s Clock event is useful for functions that need to be managed by time, such as when a function is called at a certain time interval or after a certain amount of time has elapsed.
Property Event
Property classes are events that handle data. When the value of a bound Property() is updated, the value is automatically updated by Kivy’s observer design. This is mainly used when writing in python code.
How Kivy Events Work
Events in Kivy are managed by the EventDispatcher class , which registers, binds, and detects the occurrence of events and executes the associated callback functions.
Let’s organize the terms related to events here.
- Dispatch: is responsible for monitoring for waiting events and allowing the execution of event handlers and corresponding callback functions; in Kivy this may refer to raising an event.
- Event Listeners: are responsible for monitoring the occurrence of events.
- Event Handlers: Functions and methods that describe what to do when an event occurs.
- Callback functions: functions that are called from one function to another or passed as arguments to another function. For example, a function A calls a function B. Or, a B function is specified as an argument to an A function. In these examples, the B function is the callback function.
- bind : binds an event handler to a callback function.
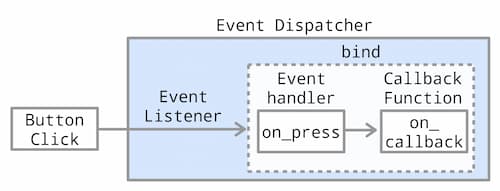
In the Kivy example, when the user clicks a button, the event monitored by the event listener is triggered and the Kivy standard event handler on_press() is called. Then, on_callback(), which was bound as a callback function, is called. These events are managed by the Event Dispatcher. on_press() is a Button event that is triggered the moment the button is pressed, and when the button is pressed, the callback function, on_callback(), is called.
Kivy Event Lifecycle
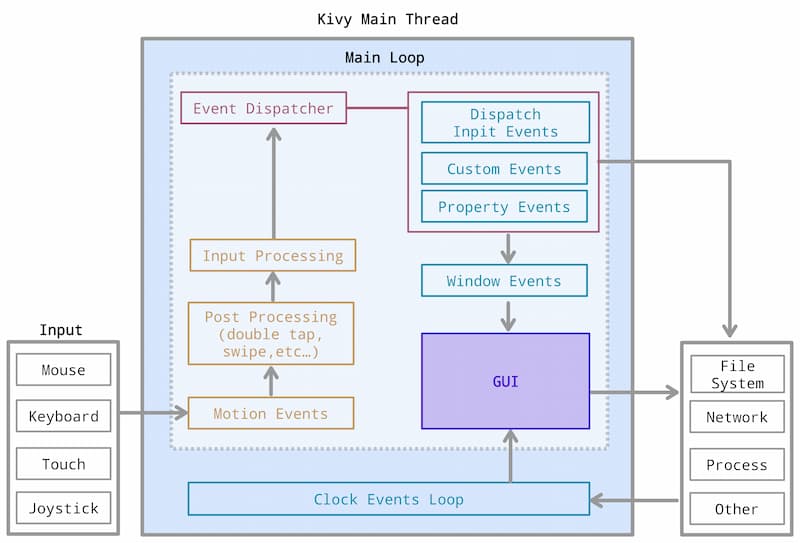
Let’s take a look at the overall event lifecycle of Kivy: when the Kivy application is launched, the main loop that waits for events starts when the kv file is loaded or the widget tree is built, and this loop continues until the application is terminated. When an action such as a click or tap occurs, the Event Dispatcher, which monitors events, detects that an event has occurred and calls an event listener. Next, the event handler and callback functions associated with the event are called and executed. Next, the Window class event, if any, is executed; the Clock class is in a separate loop.
Writing Events
This section describes how to write standard Kivy event handlers. The way to write events in Python code is different from the way to write events in kv code.
How to Write Events in Python Code
In this example, two ways of using events are written: using the standard Kivy event handler, and binding and calling a callback function in addition to the standard Kivy event handler.
kivy_events1.py
from kivy.app import App
from kivy.uix.label import Label
from kivy.uix.button import Button
from kivy.uix.boxlayout import BoxLayout

class MyLabel(Label):
    def on_touch_down(self, touch):
        if self.collide_point(*touch.pos):
            self.text = "Label 2 touched!"
            return True

class MyApp(App):
    def build(self):
        layout = BoxLayout(orientation='vertical')

        self.label1 = Label(text="Label 1 : Click Button.")
        self.label2 = MyLabel(text="Label 2 : Pressing this label triggers a touch event.")

        button = Button(text="Click here")
        button.bind(on_press=self.on_button_press)

        layout.add_widget(self.label1)
        layout.add_widget(self.label2)
        layout.add_widget(button)

        return layout

    def on_button_press(self, instance):
        self.label1.text = "Button pressed!"
        self.label2.text= instance.text

if __name__ == '__main__':
    MyApp().run()
Python Code Explanation
In this sample, clicking on the Button changes the text of Label1 and displays the Button text on Label2. Also, clicking Label2 changes the text of Label2.
<RootWidget>
+--- Label
+--- Label
+--- Button
How to Use on_touch_down for Kivy Built-in Events
The following code shows the exact writing of on_touch_down(). on_touch_down() has a propagation mechanism and controls propagation by writing two returns: return True to stop propagation and return super() to call the parent on_touch_down() is called. Propagation eventually reaches on_touch_down() in the Widget class.
class MyLabel(Label):
    def on_touch_down(self, touch):
        if self.collide_point(*touch.pos):
            self.text = "Label 2 touched!"
            return True
        return super().on_touch_down(touch)
For more information on propagation, see the following article.
Here is an example of how on_touch_down() is called by the propagation mechanism. In the code below, when the label3 label is dragged, on_touch_down() of label2, which is the parent from the viewpoint of label3, is also called together. This occurs because propagation is not controlled. kv code cannot control this, so it must be written in Python code.
<RootWidget>:
    orientation: 'vertical'
    Label:
        id: label1
        size_hint: None, None
        size: 100, 50
        pos_hint: {'center_x': 0.5, 'center_y':0.7}
        text: 'Touch the Label and an event will occur.'
    Label:
        id: label2
        text: 'Touch it'
        size_hint: None, None
        size: 100, 50
        pos_hint: {'center_x': 0.5, 'center_y':0.5}
        on_touch_down: label1.text = 'on_touch_down called!'
        on_touch_up: label1.text += '\non_touch_up called!'
    Label:
        id: label3
        text: 'Drag it'
        size_hint: None, None
        size: 100, 50
        pos_hint: {'center_x': 0.5, 'center_y':0.3}
        on_touch_move: label1.text = 'on_touch_move called!'
The Python code for on_touch_down() in the kv code above is the same as below: it works without the if and return statement lines, but propagates when on_touch_* is called on multiple widgets as in the kv code example.
class MyLabel(Label):
    def on_touch_down(self, touch):
        self.text = "Label 2 touched!"
If you do not use propagation, you can write the following to prevent propagation.How to prevent it from propagating is shown in the code example in later chapters.
class MyLabel(Label):
    def on_touch_down(self, touch):
        if self.collide_point(*touch.pos):
            self.text = "Label 2 touched!"
            return True
Override event handlers when using Kivy standard event handlers. In this example, to use on_touch_down with Label 2, we define a separate class that inherits from Label, override on_touch_down, and add processing.
def on_touch_down(self, touch):The parameter touch is passed the coordinates of the parent widget.
if self.collide_point(*touch.pos):collide_point() checks if the touch point (x, y) is within the widget’s area. touch.pos is the coordinates of the touch position. In other words, it checks if the touch position is within the Label2 area.
self.text = "Label 2 touched!"Here we add a process to change the text of Label 2.
return TrueThis line is a flag to be used in the propagation mechanism of Kivy events.
How to Bind Kivy Built-in Events + Callback Functions
This section describes how to bind to standard Kivy event handlers and invoke their callback functions.
# Define a button and bind the on_press event handler and callback function.
button = Button(text="Click here")
button.bind(on_press=self.on_button_press)
Use bind() to bind a Kivy standard event handler to a callback function.
# How to write bind()
instance_name.bind (event_name = callback_function )
In this example, event_name is the Kivy standard event on_press() and callback_function is the function on_button_press().
    def on_button_press(self, instance):
        self.label1.text = "Button pressed!"
        self.label2.text= instance.text
The instance is passed the widget that triggered the event, so we can determine which widget fired the event. In this example, a Button instance is passed. For example, if multiple buttons use the same event handler, instance can be used to help determine which button was pressed.
Writing Events in the kv Language
When writing in the kv language, it is fairly easy to call event functions. You do not need to bind() explicitly. For simple processes that only refer to widgets in the same tree, it is sometimes better to write in the kv language. However, it is not suitable for many complex processes.
This sample executes the same process as the Python code in the previous section, but return is not available in the kv language, so if you want to control propagation, write it in Python code.
kivy_events2.py
from kivy.app import App
from kivy.uix.boxlayout import BoxLayout

class RootWidget(BoxLayout):
    def on_button_press(self, text):
        self.ids.label1.text = "Button pressed!"
        self.ids.label2.text = text

class KivyEvents2(App):
    def build(self):
        return RootWidget()

if __name__ == '__main__':
    KivyEvents2().run()
kivyevents2.kv
<RootWidget>:
    orientation: 'vertical'
    Label:
        id: label1
        text: 'Label 1 : Click Button.'
    Label:
        id: label2
        text: 'Label 2 : Pressing this label triggers a touch event.'
        on_touch_down:
            if self.collide_point(*args[1].pos): self.text = "Label 2 touched!"
    Button:
        text: 'Click here'
        on_press: root.on_button_press(self.text)
kv code Explanation
To use Kivy standard event handlers in the kv language, specify the event name in the properties of the widget for which you want to use the event.
event_name: processing
If you want to call a callback function, use the following
event_name: keyword.callback_function
How to Use on_touch_down for Kivy Built-in Events
on_touch_down:
    if self.collide_point(*args[1].pos): self.text = "Label 2 touched!"
Simple processes can also be written in the kv language, using if and for statements. This example uses collide_point() as in the Python code to check if the touch point (x, y) is within the widget’s area.
The args
self.text = "Label 2 touched!"

# When specified by id.
label2.text = "Label 2 touched!"
self.text changes the text of its own Label2, so it is a self keyword. In this case, since the id is set, it can also be written as id_name.text.
How to Bind Kivy Built-in Events + Callback Functions
on_press: root.on_button_press(self.text)To bind a callback function in the kv language, write keyword.callback_function. If you write it like this, it will be automatically bound by Kivy. The argument is set to self.text and the text of the Button itself is passed.
    def on_button_press(self, text):
        self.ids.label1.text = "Button pressed!"
        self.ids.label2.text = text
This is a callback function written on the Python code side. It receives the arguments passed from the kv language side in the argument text and changes them.
For more information on keywords and id, please also see the following article.
How to Write If Propagation Is Not Used
I have no problem with on_touch_* as long as it is used on one widget in the code. But if you use it on multiple widgets, it will propagate even if you don’t want it to. Below is a example of a case where propagation is not used completely.
kivy_events3.py
from kivy.app import App
from kivy.uix.relativelayout import RelativeLayout
from kivy.uix.label import Label

class CustomLabel(Label):
    def on_touch_down(self, touch):
        if self.collide_point(*touch.pos):
            root_widget = self.parent
            root_widget.ids.label1.text = 'on_touch_down called'
            return True

    def on_touch_up(self, touch):
        if self.collide_point(*touch.pos):
            root_widget = self.parent
            root_widget.ids.label1.text = 'on_touch_up called!'
            return True

class RootWidget(RelativeLayout):
    def on_touch_move(self, touch):
        if self.collide_point(*touch.pos):
            self.ids.label1.text = '\non_touch_move called!'
            return True

class kivy_events3(App):
    def build(self):
        return RootWidget()

if __name__ == '__main__':
    kivy_events3().run()
kivyevents3.kv
<RootWidget>:
    orientation: 'vertical'
    Label:
        id: label1
        text: 'Touching the Label causes an event.'
        size_hint: None, None
        size: 100, 50
        pos_hint: {'center_x': 0.5, 'center_y':0.7}
    CustomLabel:
        text: 'Touch it'
        size_hint: None, None
        size: 100, 50
        pos_hint: {'center_x': 0.5, 'center_y':0.5}
    Label:
        id: label3
        text: 'Drag it'
        size_hint: None, None
        size: 100, 50
        pos_hint: {'center_x': 0.5, 'center_y':0.3}
Code Explanation
Essentially, touch propagates to all labels. We said in the previous chapter that writing return true prevents propagation, but actually that is not enough.
This code defines a CustomLabel and separates it from the RootWidget, but all events can be overridden in the RootWidget.
class RootWidget(RelativeLayout):
    def on_touch_down(self, touch):
        pass
    def on_touch_up(self, touch):
        pass
    def on_touch_move(self, touch):
        pass
However, this configuration results in propagation. To completely prevent propagation, separate on_touch_down() into a separate class. (Or you can further separate on_touch_down() with a flag.)
In other words, you can avoid using propagation altogether by not writing on_touch_down() to the RootWidget.
In the case of the on_touch_* event, if you override the event in the Python code, you do not need to write the event in the kv code.
    CustomLabel:
        text: 'Touch it'
        size_hint: None, None
        size: 100, 50
        pos_hint: {'center_x': 0.5, 'center_y':0.5}
    Label:
        id: label3
        text: 'Drag it'
        size_hint: None, None
        size: 100, 50
        pos_hint: {'center_x': 0.5, 'center_y':0.3}
Chain Processing in the kv Language
Chain processing using semicolons is useful when describing events in the kv language. Processes are executed in the order in which they are separated by semicolons.
processing1; processing2; processing3…
on_touch_down:
    if self.collide_point(*args[1].pos): self.text = "Label 2 touched!"; app.on_label_touch(self, *args)
If the code is too long to read, a line break can be used instead of a semicolon. However, please note that line breaks in the middle of control constructs such as if and for will result in an error.
processing1
processing2
processing3
…
on_touch_down:
    if self.collide_point(*args[1].pos): self.text = "Label 2 touched!"
    app.on_label_touch(self, *args)gs)
Comment