Kivy apps can be used with the Buildozer library to create Android and iOS apps. This article explains how to build a Linux environment with WSL2 and how to install Python 3.12 and Buildozer. If you are having trouble with many errors, please try the installation procedure in this article. If you follow the procedure, you should have no problems.
What is Buildozer?
Buildozer is a library that converts Kivy applications into packages for Android and iOS mobile apps, used to package Android apps as APK or AAB format and iOS apps as IPA format.
Buildozer runs on Linux OS and Mac OS. if you want to use it on Windows, you can either build a Linux virtual environment or use WSL provided by Microsoft that can run Linux on Windows. (Windows Subststem for Linux)
Using WSL
Although WSL is basically a command operation, you can use Windows Explorer to access folders and files. Some folders have access restrictions, but it is easy and convenient to use when you want to use them only in specific cases, as in this case.
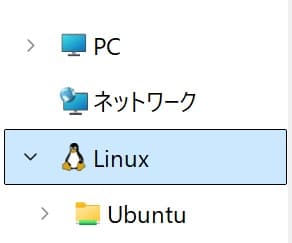
WSL1 and WSL2 are provided, and with WSL2, GUI operation of the OS and GUI operation of only applications are possible. However, it is sometimes difficult to operate the OS GUI operation due to PC specifications or graphics board. This GUI is not complete, so if you want to use Linux with complete GUI, it is recommended to build a virtual machine (VirtualBox or VMware).
Build the Environment for Buildozer
After a lot of tests, we will use the following environment this time. However, even if you are relieved that the installation is complete, if the dependencies (related libraries) are missing or the configuration file (spec file) is written incorrectly, many errors will occur and the file cannot be created. If the environment is the same, you can convert the mobile app file by following the steps below.
- Windows11
- WSL2
- Ubuntu22.04.5
- Python3.12.7
- Buildozer1.5.1dev0
If you would like to try other versions, please refer to the verification notes I left for you during installation.
WSL2 Installation
Note that the procedure is different for Windows 10. Also, WSL2 will install Ubuntu 24.4.1 (at this time) if you choose the default no install option, but we will install Ubuntu 22.4.5. Version 24 will probably make it difficult to install Buildozer.
- step1Right-click the Windows Start button and run [Terminal (Administrator)].
PowerShell is launched.
PS C:\Users\user>It appears that WSL is no longer updated by Windows Update, and the following error may occur when executing the install command. Therefore, keep WSL up to date.
Class is not registered. Error Code: Wsl/CallMsi/Install/REGDB_E_CLASSNOTREG - step2Windows Subsystem for Linux (WSL) version check
Check the currently installed version of WSL.
wsl --versionWSL version: 2.3.26.0 - step3Install the latest WSL
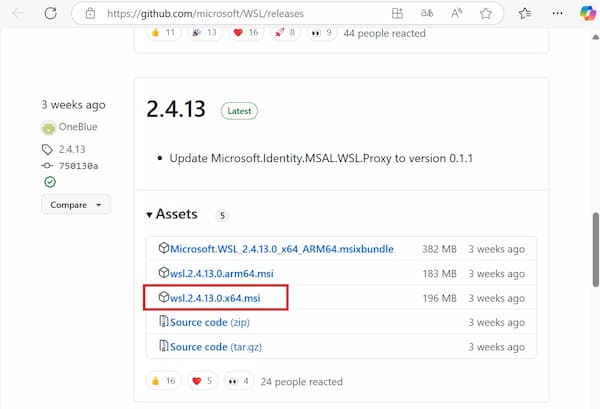
If the “WSL Version” is out of date, download it at the following site.
Select the “latest” version “x64.msi”.
- Step1Right-click the Windows Start button and run [Terminal (Administrator)].
PowerShell will be launched.
PS C:\Users\user> - Step2Installation of WSL2
Run the WSL command, specifying the Ubuntu version in the install option.
wsl --install -d Ubuntu-22.04You can also find out which versions are available for installation.
wsl --list --onlineDon’t worry about the following message: WSL2.4.8 or later seems to recommend a tar-based distribution format. tar is a package format used in linux. Legacy distribution is in Appx format package distributed via Microsoft Store.
wsl: Using legacy distribution registration. Consider using tar-based distribution instead. - Step3Set Ubuntu login user name
You will be prompted to enter your login user name. *Make a note of it so you don’t forget it.
Enter new UNIX username: - Step4Set Ubuntu login password
You will be asked to enter a password, which must be at least 8 characters long due to password restrictions in Ubuntu. Ubuntu recommends a password with a mixture of upper and lower case letters and numbers. Note that if you set a short password, it will not be recognized later and you will have to uninstall the software. Please make a note of the password so that you do not forget it.
New password:You will be asked to enter the password again.
Retype new password: - Step5A user with sudo privileges is created.
If the display changes as shown below, the installation is complete and a user with sudo privileges has been created. This user is the same as running as an administrator in Windows. This state is the terminal mode of Ubuntu.
User name@PC name:~$ - Step6Get the latest information of the package
Get the latest information of Ubuntu packages. Please execute in Ubuntu terminal mode from now on.
sudo apt updateEnter “y” and press “Enter” when a confirmation message is displayed on the way.
[sudo] password for user: - Step7Install the latest packages
Update Ubuntu package. Option [-y] skips installation confirmation. Since a significant amount of packages will be installed, it is better to have the [-y] option.
sudo apt upgrade -y
How to Start the Ubuntu Terminal Screen
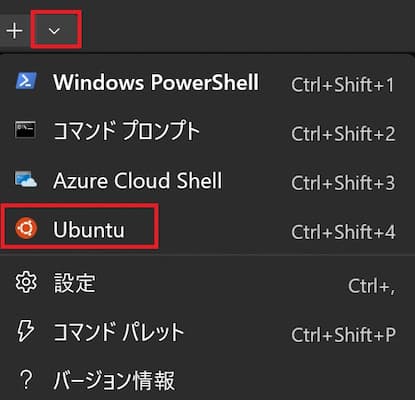
Right-click the Windows Start button, run “Terminal (Admin)” and select “Ubuntu” from the menu.

Python Installed in Ubuntu as Standard
Python is installed by default on Ubuntu. 22.04.5 has Python 3.10.12 installed in [usr/bin]. Since Ubuntu seems to use Python for other tools, I will leave it as it is and install Python 3.12.
Installing Python on Ubuntu
You can install Python from the Linux install command (apt install), but 3.12.7 is not in the Ubuntu repositories, so we will install from the package.
- Step1Install the Python dependency package.
Run the terminal in Ubuntu mode.
Install the packages required to install Python.
Below is a list of packages that you may need. (Some packages may not be necessary.)
- build-essential: C/C++ compiler (required to build Python)
- zlib1g-dev: compression and decompression
- libgdbm-dev: database-related
- libnss3-dev: security-related
- libssl-dev: SSL/TLS communication
- libreadline-dev: interactive command line editing
- libffi-dev: external function interface
- libsqlite3-dev: SQLite support
- libbz2-dev: support for BZ2 compression format
sudo apt update sudo apt install -y build-essential zlib1g-dev libgdbm-dev libnss3-dev libssl-dev libreadline-dev libffi-dev curl libsqlite3-dev wget libbz2-dev - Step2Check the version of the package for Linux from the official Python website
Check the version of Python from the official Python website. In this case, we will install 3.12.7, the last version of 3.12. You do not need to download it here, as it will be downloaded from the command line.
- Step3Download Python
Navigate to the folder where you want to save the downloaded files; in Linux, folders are called “directories,” but in this manual they are referred to as “folders” .
cd /usr/local/binDownload Python using the wget command. If you are installing a different version, change it. You will be asked to enter your password on the way.
sudo wget https://www.python.org/ftp/python/3.12.7/Python-3.12.7.tgzPython is now downloaded to [/usr/local/bin].
- Step4Extract the compressed file
Extract the downloaded compressed file.
sudo tar xzf Python-3.12.7.tgzYou will not see anything, but the decompression is probably complete.
Move to the folder where you extracted the filecd Python-3.12.7 - Step5Install Python
Check the installation environment and build and install. If you want to specify the installation location, specify the option [–prefix=PREFIX].
sudo ./configure --enable-optimizations
sudo make -j $(nproc)
sudo make altinstall
Python is now installed in [/usr/local/bin]. If you are concerned about the remaining downloaded files, delete them with the rm command.
sudo rm -r /usr/local/bin/Python-3.12.7.tgz - Step6Confirmation of installation
Check the Python version.
python3.12 --versionConfirm that the version you have installed is displayed.
- Step7Change the default Python version
Use the update-alternatives command to register Python 3.10 and 3.12 so that you can switch between them.
sudo update-alternatives --install /usr/bin/python3 python3 /usr/local/bin/python3.12 2 sudo update-alternatives --install /usr/bin/python3 python3 /usr/bin/python3.10 1 sudo update-alternatives --config python3 - Step8Register default Python
Make sure to use 3.12 by default.
Enter “0” and press “Enter”.
Selection Path Priority Status ------------------------------------------------------------ 0 /usr/local/bin/python3.12 2 auto mode 1 /usr/bin/python3.10 1 manual mode * 2 /usr/local/bin/python3.12 2 manual mode Press <enter> to keep the current choice[*], or type selection number: - Step9Confirmation of python3 command
Check if 3.12 can be used with the python3 command. Be careful, otherwise it will not work later.
python3 --versionConfirm that the version is shown as 3.12.7.
Python 3.12.7
Install the Packages Required for Buildozer
Install the packages required by Buildozer.
- Step1Packages required by Buildozer
The following is a list of packages that may be required. (There may be some packages that you do not need.)
- Java Development Kit (JDK): JDK is required for Android build.
- Git: Install Python packages directly from the Git repository
- Python Dev Header: Python development header is required
- SDL2 library: Multimedia library that Kivy depends on
- Zlib: Library required for compression
- Autoconf: Required for building Android dependencies
- libtool: Required to build Android dependencies
- unzip: unzipping
- libncurses5-dev: screen control
sudo apt update
sudo apt install -y openjdk-17-jdk python3-dev libsdl2-dev libsdl2-image-dev libsdl2-mixer-dev libsdl2-ttf-dev autoconf cmake automake libtool pkg-config unzip zip python3-venv python3-pip libtinfo5 libncurses5-dev
Creating a Virtual Environment
Create a virtual environment. At this time, installing Buildozer from pip will install 1.5.0, but since it includes libraries deprecated in Python 3.12, install 1.5.1dev0 from GitHub.
- Step1Create a virtual environment folder
Go to the user folder. This folder is an unprivileged folder and will be the current folder of the console. You can easily refer to it by typing the tilde as shown below.
cd /home/ < User Name >
cd ~Create a virtual environment folder with the venv command. Here we use “venv-py312”.
python3 -m venv < virtual environment folder name >
python3 -m venv venv-py312The specified folder is created in [home/username].
- Step2Activate the virtual environment
Activate the virtual environment with activate.
source /home/ < User Name > / < virtual environment folder name > /bin/activate
source /home/user/venv-py312/bin/activateAfter activating, “(virtual environment folder name)” will be appended to the command line display, and you will be in virtual environment mode.
(venv-py312) < User Name > @ < PC Name > :~$The virtual environment session is disconnected when the console screen is closed, so it is necessary to ACTIVATE each time the console is launched.
The following chapter shows you how to create a shortcut to start the terminal in an ACTIVATED state.
- Step3Update pip package
From now on, run in virtual environment mode.
Update the pip library to the latest version.
pip install --upgrade pip - Step4Install buildozer and related libraries
Install buildozer1.5.1.dv0 and necessary libraries.
pip install kivy cython python-for-android pip install git+https://github.com/kivy/buildozer.git pip install --upgrade buildozer python-for-android - Step5Check the installed libraries
Check to see if the libraries have been successfully installed.
pip listThe following information is displayed.
Package Version ------------------ ----------- appdirs 1.4.4 build 1.2.2.post1 buildozer 1.5.1.dev0 certifi 2024.8.30 charset-normalizer 3.4.0 colorama 0.4.6 Cython 0.29.37 docutils 0.21.2 idna 3.10 Jinja2 3.1.4 Kivy 2.3.0 Kivy-Garden 0.1.5 MarkupSafe 3.0.2 packaging 24.2 pexpect 4.9.0 pip 24.3.1 ptyprocess 0.7.0 Pygments 2.18.0 pyproject_hooks 1.2.0 python-for-android 2024.1.21 requests 2.32.3 setuptools 59.6.0 sh 1.14.3 toml 0.10.2 tomli 2.2.1 urllib3 2.2.3 - Step6To exit virtual environment mode
To exit from the virtual environment mode, execute the deactivate command.
deactivate
Create a Shortcut to the Activated WSL Terminal
Since it is troublesome to activate the virtual environment every time, this section describes how to create a shortcut for the WSL terminal in the activated state.
Please note that the names of buttons and items in the Window described below may be different from the names of the buttons and items in the Window.
- Step1Enter the source of the shortcut
Right-click anywhere on the desktop, etc. New > Create Shortcut > Create Shortcut screen, enter the following information, and press the [Next] button.
C:\Windows\System32\wsl.exe -d Ubuntu-22.04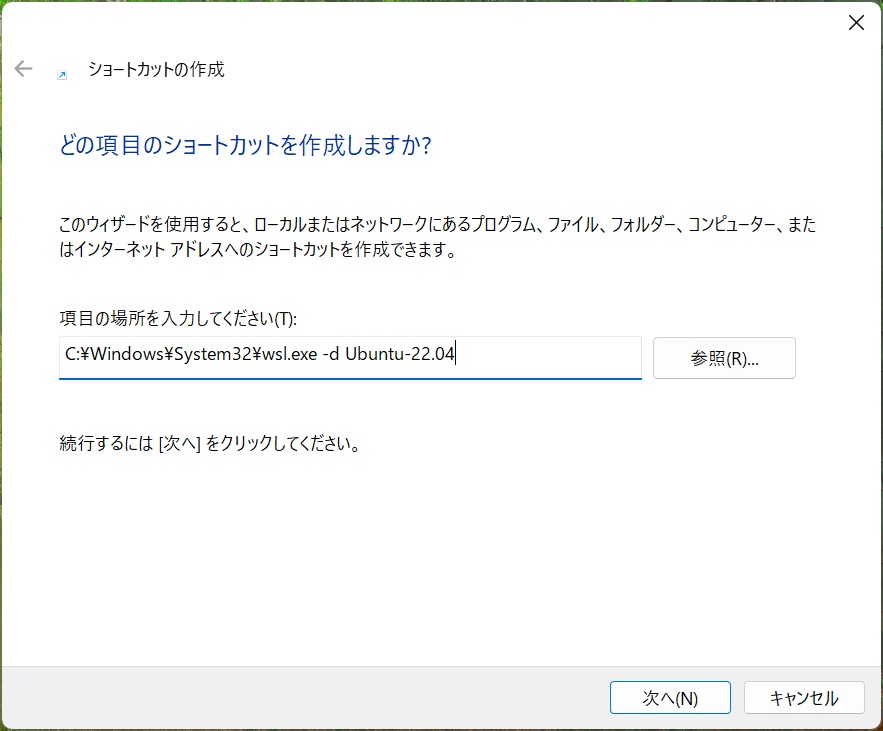
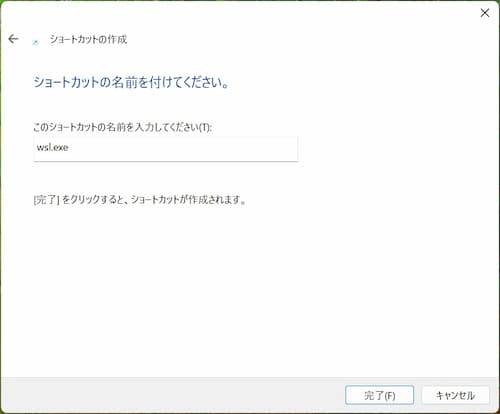
- Step2Enter a name for the shortcut
Enter a name for the shortcut.
- Step3Enter a working folder
Right-click on the created shortcut > select Properties, enter the following in the [Working Folder] field, and press the [Apply] button. (Enter your Ubuntu user folder)
\\wsl.localhost\Ubuntu-22.04\home\ < User Name >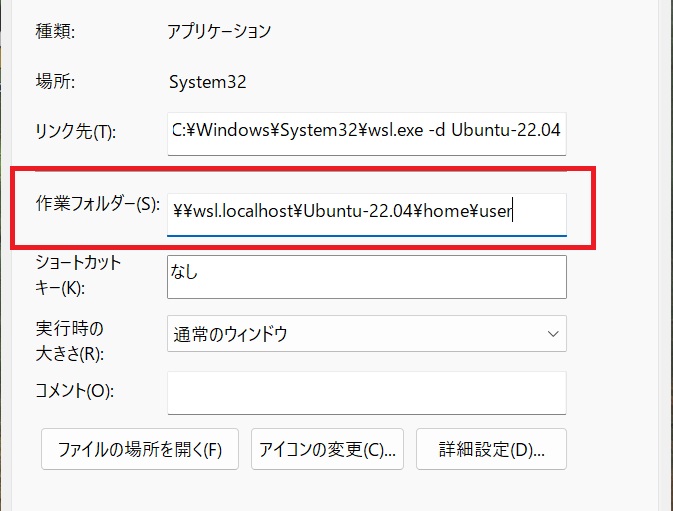
- Step4Set the icon
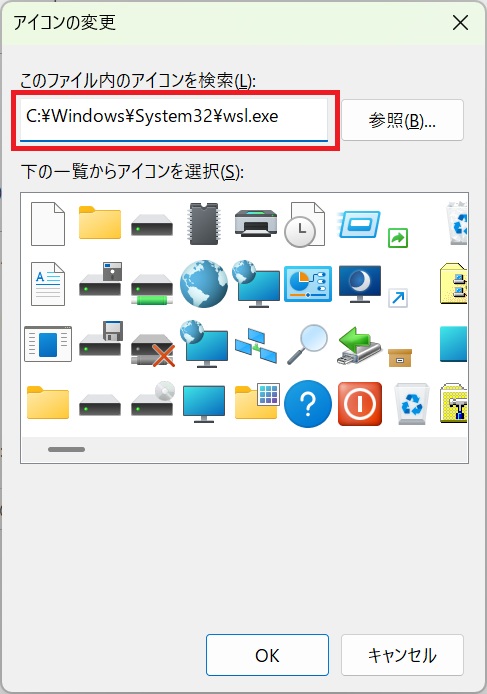
Launch the shortcut properties screen again, press the [Change Icon] button, enter the following in the [Search for icons in this file] field and press [Enter].
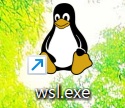
In this case, the icon is set to the Linux penguin, but you can set any icon you like.
C:\Windows\System32\wsl.exeSelect Penguin in the [Select an icon from the list below] field and press [OK].
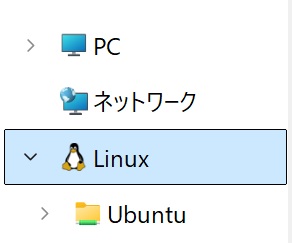
- Step5Access Ubuntu from Windows Explorer
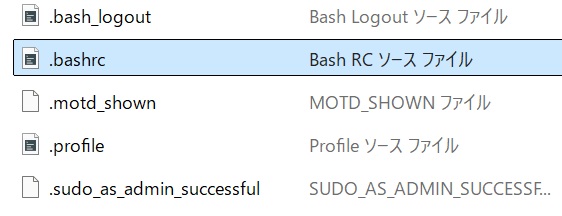
Access Ubuntu from Windows Explorer and go to the following folder and open the bash file.
If you open the file with VSCode, a warning message will appear, but press the [Allow] button.
\wsl.localhost\Ubuntu-22.04\home\ < user_name >
- Step6Edit the bash file
Add the following to the last line of the bash file and save it.
The “venv-py312” part is the name of the virtual environment folder. If you have chosen a different name, change it in two places.
if [ -d "$HOME/venv-py312/" ]; then source "$HOME/venv-py312/bin/activate" fi - Step7Launch the shortcut
Start from the shortcut you created and check that you are in virtual environment mode.
Delete WSL2
If you want to delete WSL2, it is easy to do so. all data on Ubuntu will be deleted, soplease moveimportantdata to Windows.
- Step1Launch Poser Shell.
Right-click the Windows Start button and start Power shell from [Terminal (Administrator)], then execute the following command: “Unregister. This operation has been completed successfully. Confirm the message “This operation was completed successfully.
If you installed without specifying the version of Ubuntu, only “ubuntu” will be used.
wsl --unregister ubuntu-22.04 - Step2Launch the installed application screen.
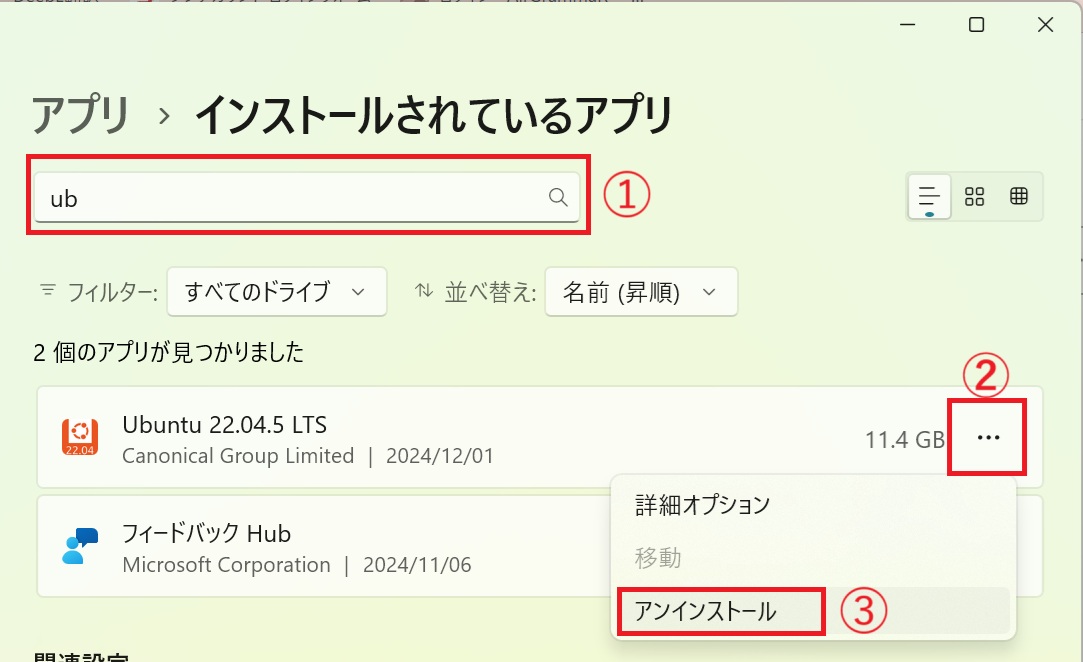
From the Windows Start button, launch the [Settings] > [Apps] > [Installed Apps] screen from the left menu.
- Step3Remove Ubuntu
- Enter “ub” in the search field.
- Press the button marked […].
- Select [Uninstall].
- Confirm the message “Deleted”.
Conclusion
We have described how to set up a Linux and Python environment with MSL2. I spent 4 days to try one library. And it’s been four days since I made my Ubuntu debut! Please forgive me if there are some funny expressions. In the next article, I will explain how to create APK and AAB for Android applications using Buildozer.



Comment