The default specification of the Kivy application cannot handle Unicode characters. Since I use Japanese, I need to make my Kivy application support Unicode characters. There is a way to change the default font of the Kivy system, but it is a bit tedious. Therefore, we will explain other methods as well.
To Display Unicode Characters in the Kivy Application
Kivy does not support Japanese by default, so when Japanese is displayed in a Kivy application, many Tofu characters appear and are garbled, as shown in the figure below.
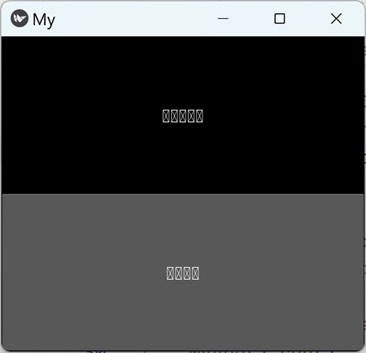
There are currently three ways to display Unicode characters such as Japanese in Kivy applications. In my country, a method exists to use a library that displays Japanese characters. If you have a library that displays characters from your country, you can also use that.
- Change the default font for the Kivy system. This is only valid within the application.
- Specify a font file with the font_name property.
- Change the default font of the Kivy system. This changes the system settings themselves.
The first method is to write a definition in your code that changes the default font. This is only valid within the application in which the code is defined.
The second method is to define in your code that the specified font file can be used with the font_name property.
The third method does not affect your code as long as you set this up first and use the kivy default fonts.
The first and second methods can be a bit tedious because they have to be written in the code each time. If you want to change the font for each application, we recommend the first or second method. If you don’t want to write it in the code each time, we recommend the third method. If you are make a mobile application, the second method is probably your only option.
Change the Default Font of the Kivy System
LabelBase.register() changes the default value of the system font to the specified font file. This is only valid within the application defined in the code.
Prepare the font file. As far as I have tried, extensions ttf and ttc worked.
If you wish to obtain font files from the OS font folder, copy the files. Do not move the files. This is your responsibility to do correctly.
Step 1: Prepare font file and place them in a folder of your choice. Here, we create a fonts folder directly under the project folder (PythonWork) and place the font file in it.
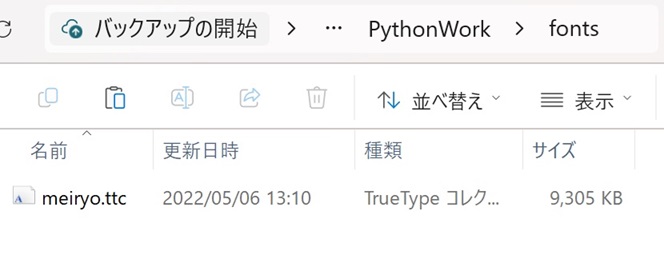
Step 2: Add the following code to your project. This should be written for each application.
from kivy.core.text import LabelBase, DEFAULT_FONT
import os

font_path = os.path.join(os.path.dirname(__file__), 'fonts','NotoSansJP-Regular.ttf')
LabelBase.register(DEFAULT_FONT,font_path)
Code Example
set_jp_font1.py
from kivy.app import App
from kivy.uix.boxlayout import BoxLayout
from kivy.core.text import LabelBase, DEFAULT_FONT # Add code
import os # Add code

# Add code
font_path = os.path.join(os.path.dirname(__file__), 'fonts','NotoSansJP-Regular.ttf')
LabelBase.register(DEFAULT_FONT,font_path)

class RootWidget(BoxLayout):
    pass

class SetJpFont1(App):
    def build(self):
        return RootWidget()

if __name__ == '__main__':
    SetJpFont1().run()
setjpfont1.kv
<RootWidget>:
    orientation: 'vertical'

    Label:
        text: "Changed font"
    Button:
        text: "Changed font"
If you use the KV language, you don’t need to specify the font again in the KV file. This is because you aren’t specifying a font for the widget, but rather the system default font.
os.path.dirname() is used to obtain the folder where the code is located. os.path.join() is used to specify the path to the font file as arguments.
project folder
+---app folder  # Get the hierarchy above this with os.path.dirname()
+---+---fonts folder  # The argument to os.path.join() specifies a path in the hierarchy below this hierarchy.
+-------+---font_file.ttf
+---main.py
+---app.kv
Specify a Font file With the font_name Property
Prepare the font file. As far as I have tried, extensions ‘ttf’ and ‘ttc’ worked.
If you wish to obtain font file from the OS fonts folder, copy the files. Do not move the files. This is your responsibility to do correctly.
Step 1: Prepare font file and place them in a folder of your choice. Here, we create a fonts folder directly under the project folder (PythonWork) and place the font file in it.

Step 2: Set the path to the prepared font in the font_name property. Here, the font_name property is described in the Label widget.
font_name = "Write the path to the font file here (also write the extension)"※Another method is to use the font_family property with the Pango library.
Code Example1
SetJpFont2.py
from kivy.app import App
from kivy.uix.boxlayout import BoxLayout
import os # Add code

class RootWidget(BoxLayout):
    pass

class SetJpFont2(App):
    # Add code
    font_path = os.path.join(os.path.dirname(__file__), 'fonts','meiryo.ttc')

    def build(self):
        return RootWidget()

if __name__ == '__main__':
    SetJpFont2().run()
SetJpFont2.kv
<RootWidget>:
    orientation: 'horizontal'

    Label:
        text: "use Meiryo-font"
        font_name: app.font_path
    Button:
        text: "font is not set."
When this code is executed, the display will look like the figure below. This code specifies a font for the Label widget, but not for the Button widget.
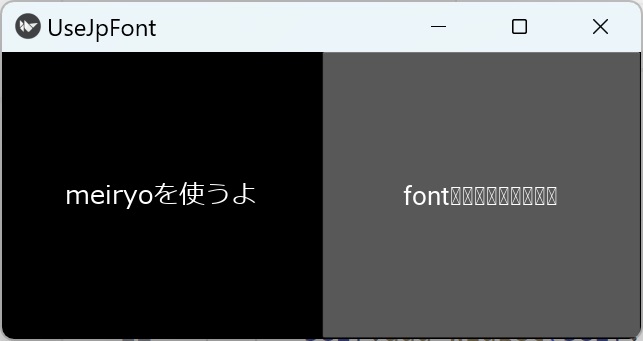
This is quite tedious because you have to specify the font for each widget one by one. The original purpose is to change the font of some text strings. However, if you use the kv file, you can change the font all at once. (It may still be troublesome)
Code Example2
set_jp_font3.py
from kivy.app import App
from kivy.uix.boxlayout import BoxLayout
import os # Add code

class RootWidget(BoxLayout):
    pass

class SetJpFont3(App):
     # Add code
    font_path = os.path.join(os.path.dirname(__file__), 'fonts','NotoSansJP-Regular.ttf')

    def build(self):
        return RootWidget()

if __name__ == '__main__':
    SetJpFont3().run()
setjpfont3.kv
<CustomLabel@Label>:
    font_name: app.font_path
<CustomButton@Button>:
    font_name: app.font_path

<RootWidget>:
    orientation: 'vertical'

    CustomLabel:
        text: app.font_path
    CustomButton:
        text: 'font specified.'
By using the Dynamic class to inherit from the Label and Button widgets and defining your own settings, all Label and Button custom widgets used in that code will reflect the same properties.
Change the Default Font of the Kivy System (Change the System Settings Themselves)
Do not do this if you do not understand this chapter. Do it at your own risk!
It is very tedious to write the same thing every time. It is quite painful for me. This chapter uses an example of changing a Japanese font file.
There are two ways to change kivy system settings.
- Modify configuration files directly.
- Define Config.set() to change settings from Python code.
The configuration file is called a “config file” or “INI file”.
This section describes how to modify the INI file.
The Kivy system uses four font files: Regular, Italic, Bold, and Bolditalic. These font files are used when an application requires italic or bold text styles. For Japanese, italic font files probably do not exist. However, since both Regular and Bold font files are available, both fonts have been changed.
If the INI file is written incorrectly, an error will occur when trying to start the kivy application and it will not start. Please be sure to back up your configuration file.
If this is done, please do so in a virtual environment.
Step1: Prepare font files.
If you wish to obtain font file from the OS fonts folder, copy the files. Do not move the files. This is your responsibility to do correctly.
Step 2: Place the font files in a folder of your choice. In this case, we chose the folder where the Kivy system fonts are located. The regular font is “UDDigiKyokashoN-R.ttc” and the bold font is “UDDigiKyokashoN-B.ttc”.
[(venv folder)\Lib\site-packages\kivy\data\fonts]
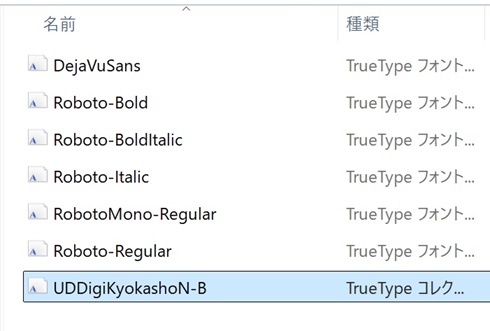
Step 3: The INI file is located in the following location. If it is not in the following location, try searching for “.kivy” or “config.ini” in Explorer; on Linux, the “.kivy” folder is not likely to be created until you start Kivy once.
Windows : [C:\Users\ <user name> \.kivy\config.ini]
Mac : [/Users/ <user name> /.kivy/config.ini]
Linux : [/home/ <user name> /.kivy/config.ini]
Copy and paste the [config.ini] file and make a backup.
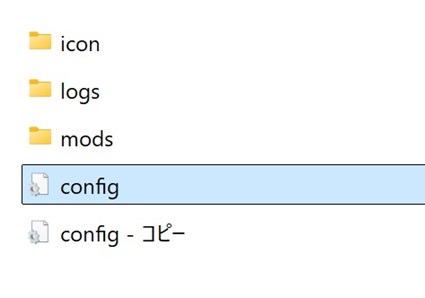
Step 4: Open the config file with Notepad, etc. and edit the following values.
[default_font] item in the [kivy] section
Change the second element in the list to the path to the regular font file you prepared. This path should include the file extension (ttf, ttc, etc.). The file changed here will be “UDDigiKyokashoN-R.ttc” (if the folder is different, change the path as well).
Change the bold font file in the same way as above. To change the bold font, change the fourth element in the list. Here the font file is changed to “UDDigiKyokashoN-B.ttc”.
;You can comment with “;” (semicolon).
;default_font = ['Roboto', 'data/fonts/Roboto-Regular.ttf', 'data/fonts/Roboto-Italic.ttf', 'data/fonts/Roboto-Bold.ttf', 'data/fonts/Roboto-BoldItalic.ttf']
;               ↓         ↓
default_font = ['Roboto', 'data/fonts/UDDigiKyokashoN-R.ttc', 'data/fonts/Roboto-Italic.ttf', 'data/fonts/UDDigiKyokashoN-B.ttc', 'data/fonts/Roboto-BoldItalic.ttf']Step5: The first element of the list is just a name. Enter any name you wish. If you don’t change it, it probably won’t affect you.
default_font = ['Kyokasho', 'data/fonts/UDDigiKyokashoN-B.ttf', 'data/fonts/Roboto-Italic.ttf', 'data/fonts/Roboto-Bold.ttf', 'data/fonts/Roboto-BoldItalic.ttf']Step6:Overwrite and save the INI file. When you start the application, it is in Japanese.。
The figure below shows an application that was converted to a Windows exe file after the Japanese was displayed in the application using the method described in this chapter. We were able to convert it to Japanese without including the description of the font file in the code.

Unfortunately, for mobile applications, simply changing the system font was not enough to display Japanese. You need to specify the font in your code and include the font file.

Kivy Default Font Specifications
Let me explain why it is the second element in the list. There are five elements in the [default_font] list in the configuration file, and the argument of LabelBase.register(), which reads this list, is five. Therefore, adding to this will result in an error. The first element in the list is used by name, which means that up to 4 font files can be stocked.

- Element(1) : name → name
- Element(2) : FONT_REGULAR → fn_regular
- Element(3) : FONT_ITALIC → fn_italic
- Element(4) : FONT_BOLD → fn_bold
- Element(5) : FONT_BOLDITALIC → fn_bolditalic
And elements 2 through 5 are stored in arrays from [0] to [3], and the default_font is initially FONT_REGULAR at [0]. So the second element has been changed.
Unicode Characters Support for Text Input on Android
I have always thought that Japanese input on Android was not possible, but it is still not possible with the standard Android Gbord keyboard, but it is possible with the Simeji keyboard. I confirmed this with Andoroid version 15 and Simeji 21.4. Emoji and environment dependent characters cannot be input directly. It is difficult to use, but it seems that Japanese language support has been added. It seems to be usable for personal applications.
Correction: If you set input_type to text, etc. in TextInput, you can input Unicode characters in Gbord. Default is null, fixed to English keyboard. Emoji and environment-dependent characters are tofu characters, so these need to be handled separately.
<RootWidget>
    orientation: "vertical"
    Label:
        id: label
        text: ""

    TextInput:
        input_type: 'text'
        hint_text: "text"
        on_text: label.text = self.text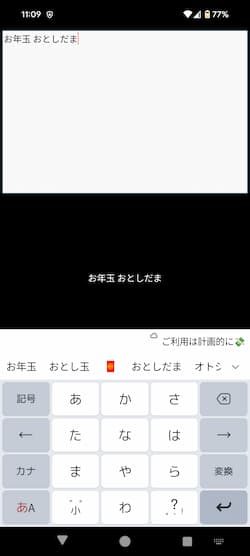

Comment